Archive for the 'Uncategorized' Category

Gajar Halwa

November 2, 2013

DSC_0196

On November 1, I decided that it was time to challenge myself.  Time to put away the sweets, time to cut the carbs, and time to be generally healthy.  November 2nd was the start of Diwali.  And you may have heard of a little eating holiday at the end of the month.  I don’t know what I was thinking, really.  My challenged has ended.

DSC_0183

But even though my mom brought me many sweets, and my aunt sent me a box of sweets, and my other aunt made other sweets (this is the best time of year, isn’t it?!), I decided that I can go a wee bit healthier this year with my Diwali dessert.

DSC_0185

The truth is that I didn’t love whenever my mom made gajar halwa for special occasions.  I did not believe that anything with heaping cups of shredded carrots could be delicious.  I thought it was a sneaky way for my parents to get me to eat my vegetables.

DSC_0187

I was stupid, I later found out.  Now, of course, I’m so sad about the number of times I passed on gajar halwa  because of my youthful stupidity.   The beauty of this dessert is that it is on the healthier side (healthy challenge lives!), but the carrots cook into this sweet, caramelized, creamy pudding.  Satisfying for the holidays, and, hey, it’s good for your eyes!  Consider that to be a Diwali gift.  Happy Diwali!

DSC_0190

Gajar Halwa

4 cups whole milk

4 cups grated carrots (from about 4-5 carrots)

1.5 tbsp. ghee or butter

1/2 cup almond meal, toasted

3/4 cup sugar

1/4 – 1/2 tsp. cardamom (optional)

2 tbsp. toasted sliced almonds (optional)

Heat milk in a pot over medium high heat, until it comes to a boil.  As soon as it comes to a boil, reduce the heat and keep the milk warm and simmering.

Meanwhile, grate carrots.  Heat the ghee in a deep pan, or pot until melted.  Add carrots and saute until the carrots become a shade paler.  This will take about 5-7 minutes.

Ladle about 2 spoonfuls of milk into the carrots.  Stir continuously until the carrots have absorbed most of the milk.  Keep adding and let it absorb, much like a risotto.  When 3/4 of the milk has been added, add the ground almonds and sugar to the carrot mixture, continuously stirring.

Add the last of the milk and continue to cook until all of the liquid has evaporated and the carrot mixture is thick and creamy.  The whole process should take about 30-40 minutes.

Add cardamom powder, if using.  Adjust sugar to taste.  Decorate with toasted sliced almonds.  Serve warm.

Buttermilk Ice Cream with Concord Grape Swirl

October 24, 2013

DSC_0138

This post was supposed to be one about grape jelly.  Turned out that after spending time buying, cooking, straining, and cleaning (cooked grapes…they stain, people), my grape “jelly” looked like this:

DSC_0144

But let me back up.  Have you ever had Concord grapes?!  They have always intrigued me – kind of like champagne grapes…what are those?! – so I finally bought them.  They are the grapiest tasting grape I have ever tasted.  Yes, people, that sentence made sense, read it again.  These grapes are the grapes of your childhood – grape flavored children’s liquid Dimetapp?  Grape flavored lollipops?  And hello, PB&J?!

DSC_0065

After that one taste of this grapey grape, I knew I had to make homemade grape jelly.  Oh my goodness, and then make homemade peanut butter.  On homemade bread!  And then have the most satisfying (and labor intensive) peanut butter and jelly sandwich ever!  But first, the grape jelly.  I had just started the process when I realize that the recipe called for four cups of sugar!  I went with one cup – I felt like that was enough.  I know that sugar helps to thicken, I do.  But I just couldn’t bring myself to do it.  Instead,  I threw in some lemon juice and a bay leaf for good measure and ended up with the most delectable jelly sauce ever.  One that never thickened.

DSC_0139

There was nothing else I could do but to swirl it into some homemade buttermilk ice cream.  Tangy and creamy and sweet with this grape flavored deliciousness swirled throughout.  I’m happy with this outcome.  I hope none of my jellies ever gel again.  (No, I don’t mean that).

Grape Jelly (Sauce) (adapted from Epicurious)

  • 3 lb Concord grapes, stemmed
  • 1 cup sugar
  • juice of 1 lemon
  • 1 bay leaf

Take grapes off of stems and rinse.  Bring to a boil with 1 cup of water.  Simmer for an additional 10 minutes until skins start to slide off and the seeds rise to the top.  The grapes should be falling apart.  Strain the grapes, pressing to release all of the juices.  Discard the skin and seeds.

Place the juice back into the pot, and add sugar, lemon juice and bay leaf.  Bring to a slow boil for about 30 minutes.

I should note that I did nothing to properly can this sauce, so don’t leave it at room temperature!  To sterilize and can, follow the directions in the link above.

Buttermilk Ice Cream (adapted from Serious Eats)

  • 1.5 cups heavy cream
  • 1 cup buttermilk
  • 1/2 cup sugar
  • 1 cup 2% milk
  • 1 tsp. vanilla

Combine everything in a bowl and refrigerate overnight.  Churn ice cream the next day using your ice cream maker’s instructions.  When finished churning, place the ice cream into a container.  Pour about 1.5 cups of the grape sauce on top.  Using a butter knife, swirl the grape sauce into the ice cream, making sure that it’s not completely mixed in.  Put in freezer.  Serve with additional sauce.

No ice cream maker?  That’s fine!  There are other methods!

Homemade Cinnamon Toast Crunch

October 19, 2013

DSC_0087

I really love doing this.  You know, finding recipes for store-bought delicious things and trying to make them at home.  It’s always so fun and satisfying and always so delicious!  But not in the same way.  They taste delicious in that, “I know this is homemade and so tastes like it’s homemade” way.  Okay, I’m about to say something controversial: the homemade versions of store-bought things don’t always taste better.

DSC_0079

Eep.

DSC_0081

Let me clarify.  They almost never taste the same.  These goldfish crackers tasted like baked cheese puff pastry.  Hello. That’s amazing.  And these pop tarts tasted like a breakfast pie.  Pie!  But they don’t taste like the goldfish crackers from the supermarket, or the pop tarts from the vending machine.  They are missing the artificial preservatives piece that I, you know, skip adding.  And sometimes, that’s just what you want.

DSC_0088

Alas.  Here we are to these cute little cinnamon toast crunch.  These are so simple to make, and they are just so, so good.   I mean, this is now my definite go-to recipe for homemade graham crackers.  But that is what these are: absolutely mouthwatering miniature cinnamon sugar graham crackers.  Oh please, no need to be sad!  Time to make some homemade miniature marshmallows for some homemade miniature s’mores.  Sprinkle some store bought Cinnamon Toast Crunch on top and you’ll have yourself a party.

DSC_0096

Homemade Cinnamon Toast Crunch (recipe from Food52)

Cereal:

  • 1 1/4 cup white whole wheat flour or whole wheat pastry flour
  • 1 1/4 cup all-purpose flour
  • 2 teaspoons baking soda
  • 2 teaspoons cinnamon
  • 1/3 cup room temperature butter
  • 1/3 cup brown sugar
  • 1/8 cup granulated sugar
  • 1 tablespoon vanilla extract
  • 3 tablespoons honey
  • 1/2 cup buttermilk

Cinnamon-Sugar Topping:

  • 1 tablespoon melted butter
  • 1/8 cup granulated sugar
  • 3/4 teaspoons cinnamon
  1. Preheat the oven to 350° F and line two baking sheets with a silpat or parchment paper.
  2. In the bowl of a food processor, add the whole wheat flour, flour, baking soda, and cinnamon. Pulse to combine. Then add in butter, brown sugar, sugar, vanilla, and honey. Process until the dough looks like small peas, then add in the buttermilk and process until a dough ball forms. The dough will seem dry and crumbly, but this is fine.
  3. Dump the dough out onto a lightly floured counter and pinch any crumbles of dough together with your hands. Divide the dough into four flat disks.
  4. Working with one piece of dough at a time place a piece of wax paper over the dough, roll the dough as thin as you can, no thicker than 1/4-inch thick, but preferably an 1/8-inch thick (about the thickness of a quarter). Remove the top piece of parchment paper.
  5. With a pastry cutter, pizza cutter, or very sharp knife, even the edges of the rectangle. Slice into 1/2-inch squares and pierce each square with a fork 2 or 3 times.
  6. Make the cinnamon-sugar topping: in a small bowl, combine 2 tablespoons of sugar and 3/4 teaspoon cinnamon. In another bowl, melt the remaining 1 tablespoon butter in the microwave. Brush the whole sheet of dough with the melted coconut oil and then generously sprinkle with the cinnamon sugar.
  7. Use a very thin spatula and scrape the squares off the counter and then carefully use your hands to place the squares on the prepared baking sheets.
  8. Repeat with the remaining dough until all the dough has been used.
  9. Bake for 10 minutes or until lightly golden brown on top (watch closely). Allow to cool completely and store in an airtight container.

Smith Island Cake

October 10, 2013

DSC_0059

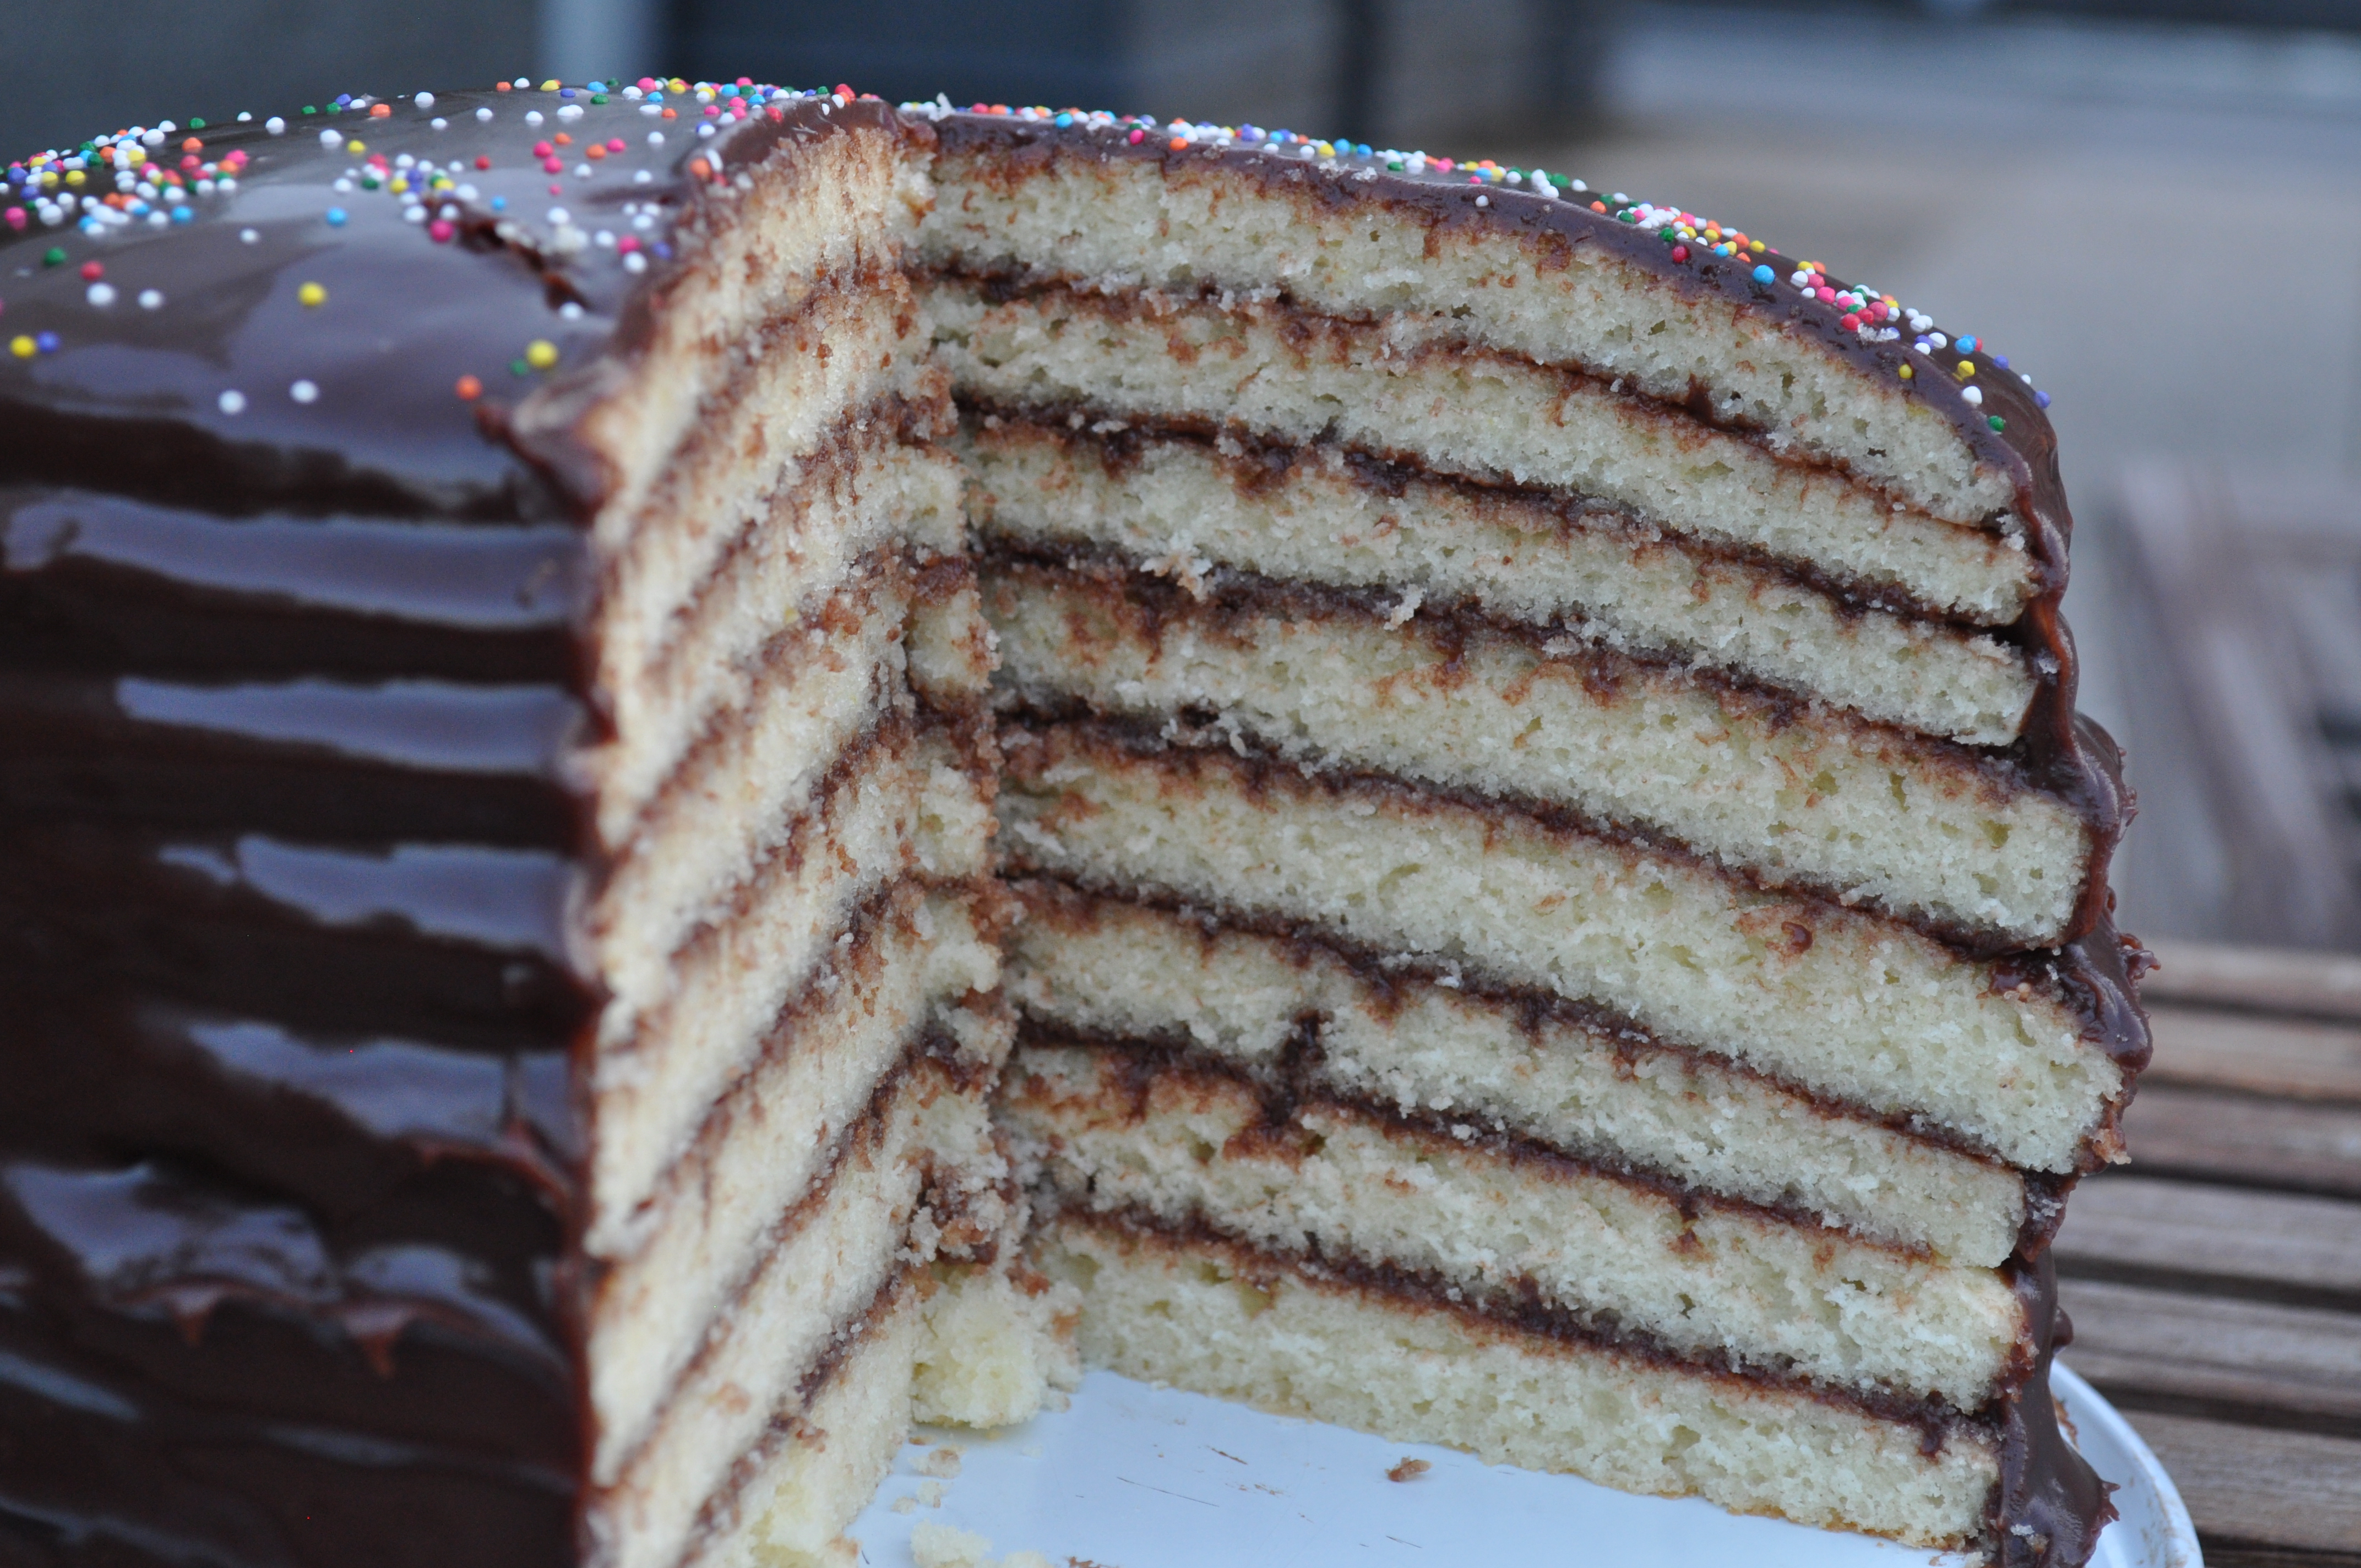
After making this recipe, I came away with one valuable lesson: if you want to make a multiple layer cake, make sure you have multiple cake pans.  It’s just good sense, really.  Because, there I was, in the kitchen, making pretty much the easiest from-scratch cake batter I had ever made, thinking that maybe it would have been wise to time myself to set some kind of record of fastest cake making ever (perhaps a little presumptuous…), and then noticed that I only have two cake pans.  Two cake pans for a 10 layer cake!  I was in the kitchen for a while.

DSC_0038

This all started because it was that time of year again. My sisters birthday.  And, of course, she wanted a cake bigger and badder than the one from the year before.  The criteria, like always, was the same: must include chocolate but may not be a chocolate cake.  Usually there are more, but she said that she was “making it easy for me this year.”  Or maybe she was giving me a challenge?  Still can’t figure that one out.

DSC_0054

But I was one step ahead, because, people, I thought that I had tricked her.  Because this recipe is just one of a (really tasty) yellow cake with a (really delicious) chocolate icing.  Nothing fancy.  Nothing crazy.  Just really grand looking.  I thought that I would sneak into the kitchen and get it done without telling anyone!

DSC_0057

Turns out people knew.  Right around the time when I was washing the cake pans for the 4th time, muttering about how two thick layers would have been perfectly acceptable.  But then all of a sudden, it was put together.  And it was brilliant.  I mean, it was one impressive cake.  It was just so tasty – moist and just the right amount of intense chocolate and dainty and just so pretty.  Fine, I’ll say it.  I’ll make it again.  As soon as I get a couple more pans.

DSC_0063

Smith Island Cake (slightly adapted from Saveur)

I should reiterate that this cake is actually quite easy to make and assemble, even if you don’t have a gazillion cake pans.  Which is just fine, but makes the end results that much tastier (because all of that effort is mixed in with the cake batter).  I ended up using 10 inch cake pans, which made 6 layers, and then made 1/3 of the cake batter to make two more layers.  Whoa, I only made 8 layers, I just realized.  Oh man, I just relived it.  I’m tired again.

FOR THE CAKE:
24 tbsp. unsalted butter, melted, plus more for pans
3½ cups flour, plus more for pans
4 tsp. baking powder
1½ tsp. kosher salt
2¼ cups sugar
2 cups milk
1 tbsp. vanilla extract
6 eggs

FOR THE ICING:
2 oz. unsweetened chocolate, chopped
3 oz. bittersweet chocolate, chopped (don’t use chocolate chips)
2 cups sugar
1 cup evaporated milk
6 tbsp. unsalted butter, melted
2 tsp. vanilla extract
1/2 tsp. flaky sea salt, or any other type of mild salt

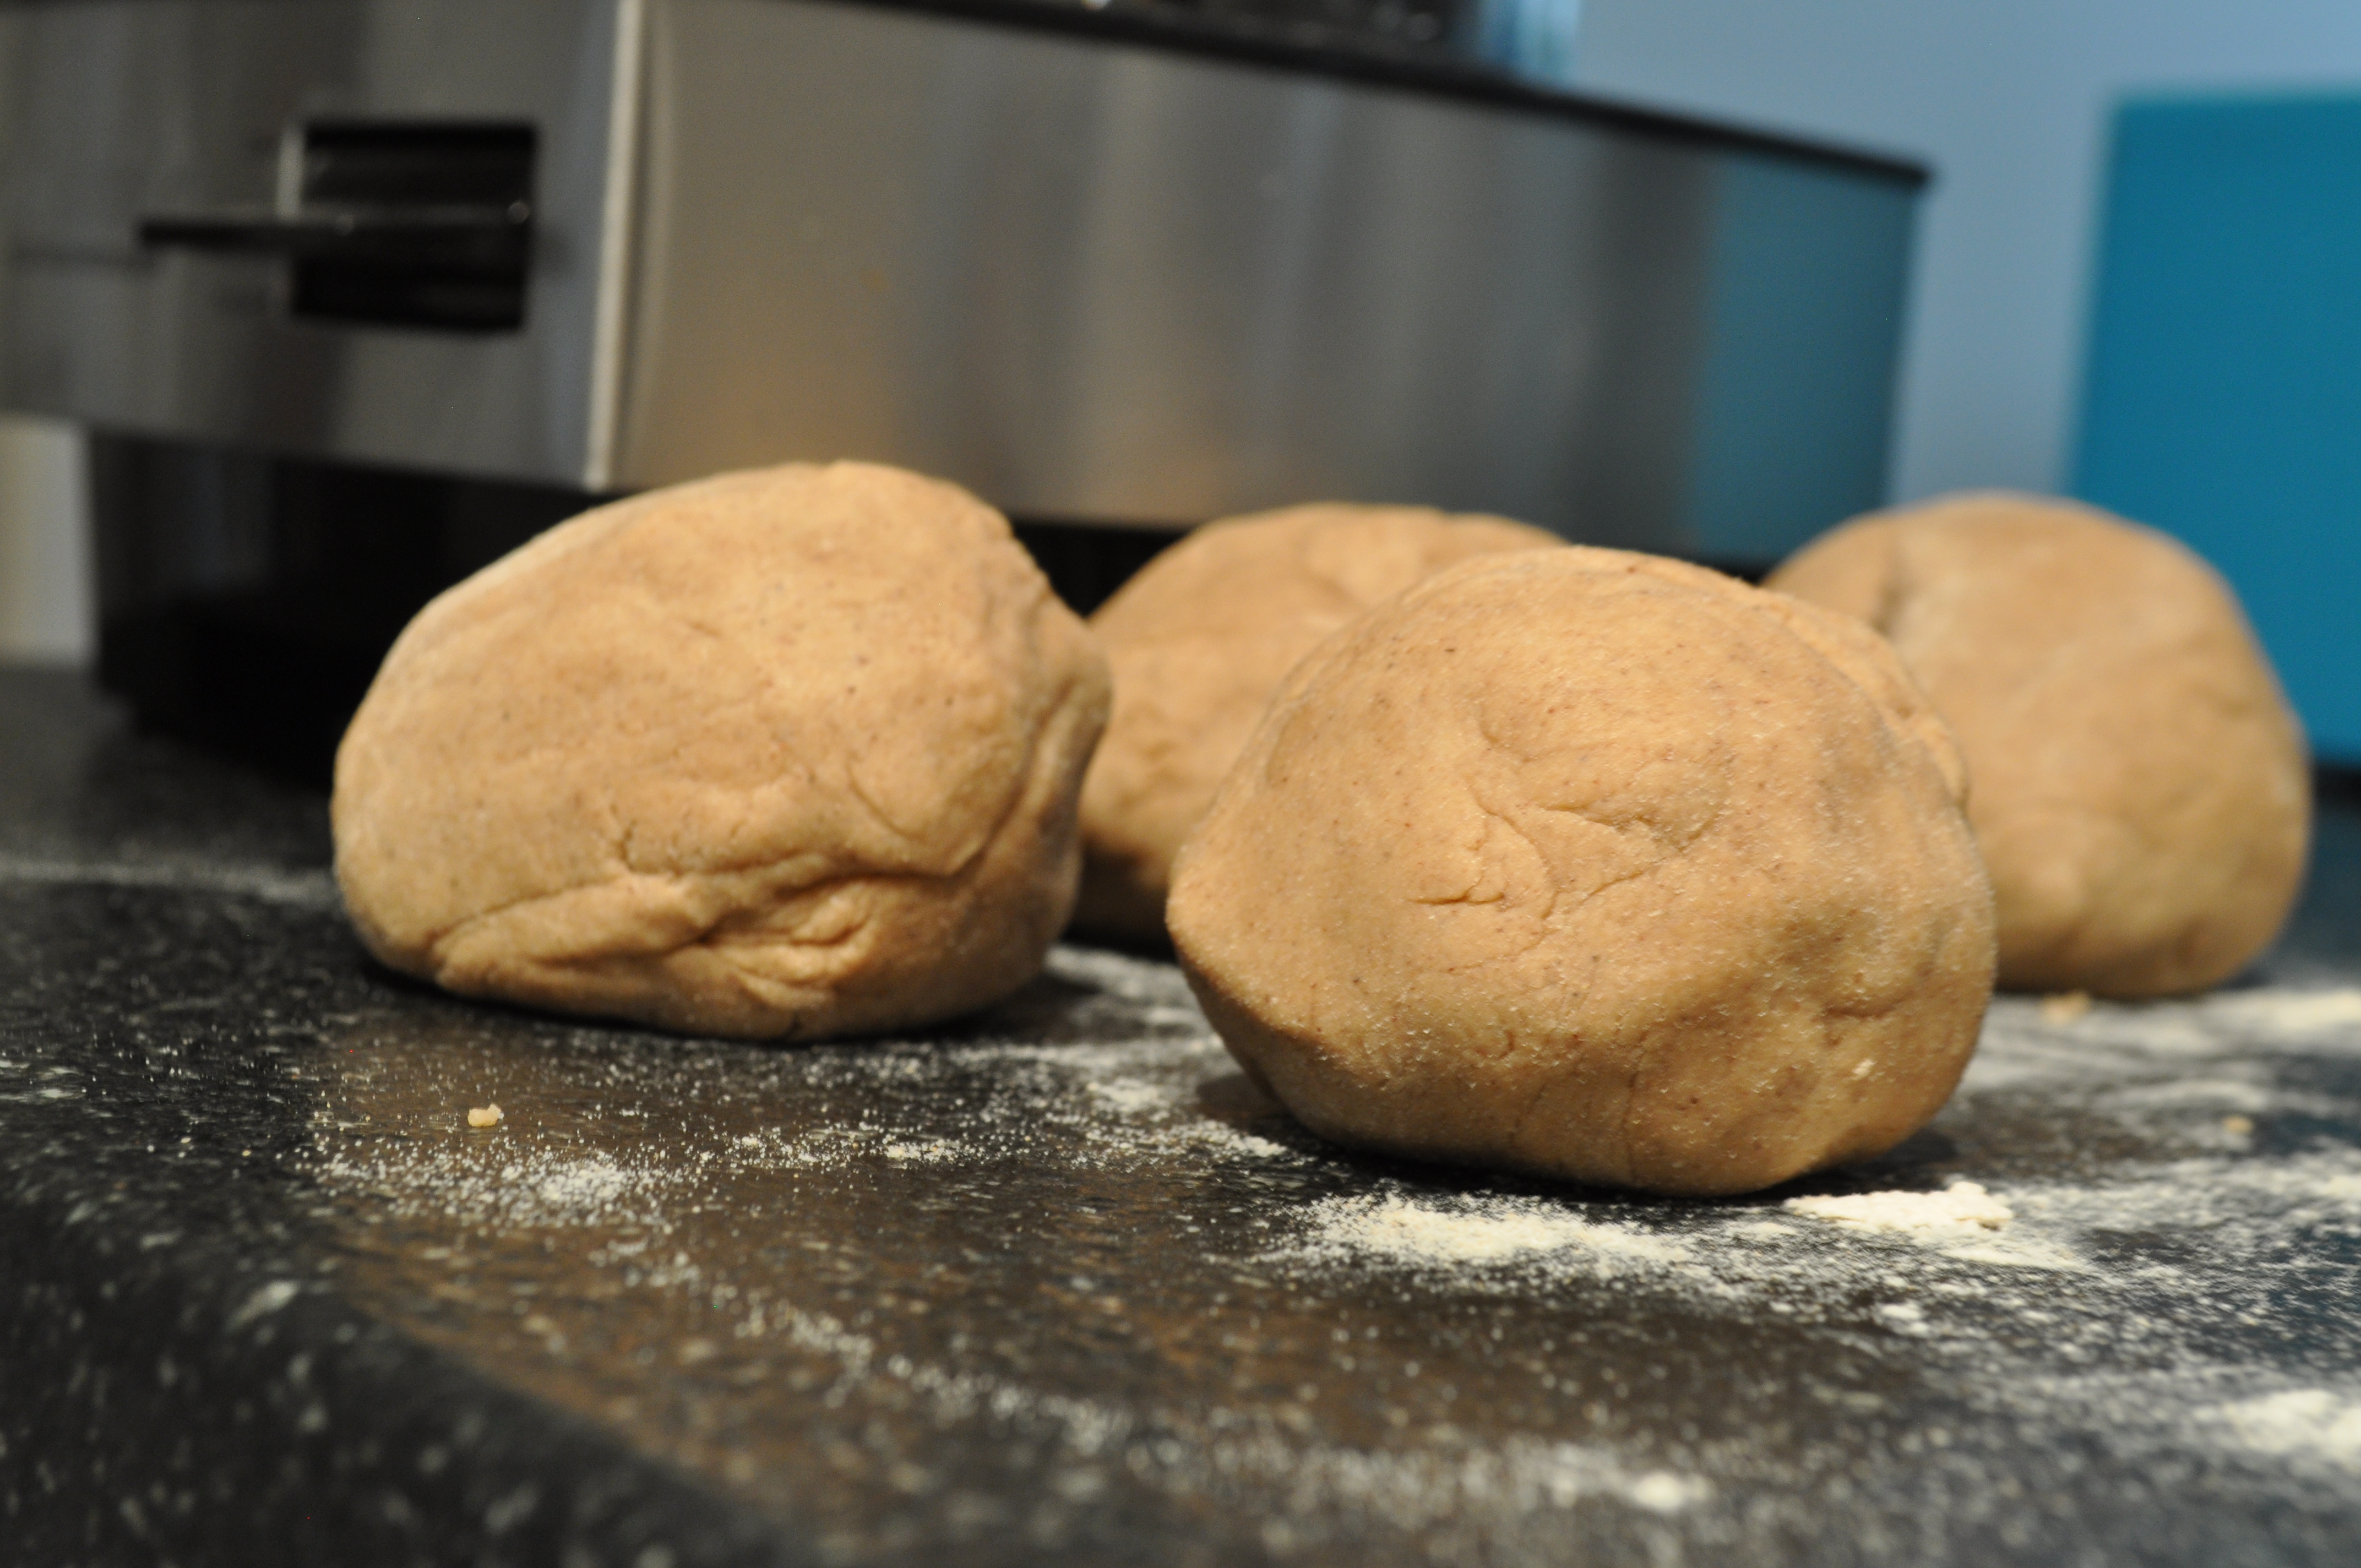
1. Make the cake: Heat oven to 350°. Butter and flour four 9″ cake pans; set aside. Whisk together flour, baking powder, and salt in a large bowl; set dry ingredients aside. Whisk together butter, sugar, milk, vanilla, and eggs in another bowl. Pour wet ingredients over dry ingredients, and using a whisk, or rubber spatula stir together until just combined; let batter sit for 10 minutes.

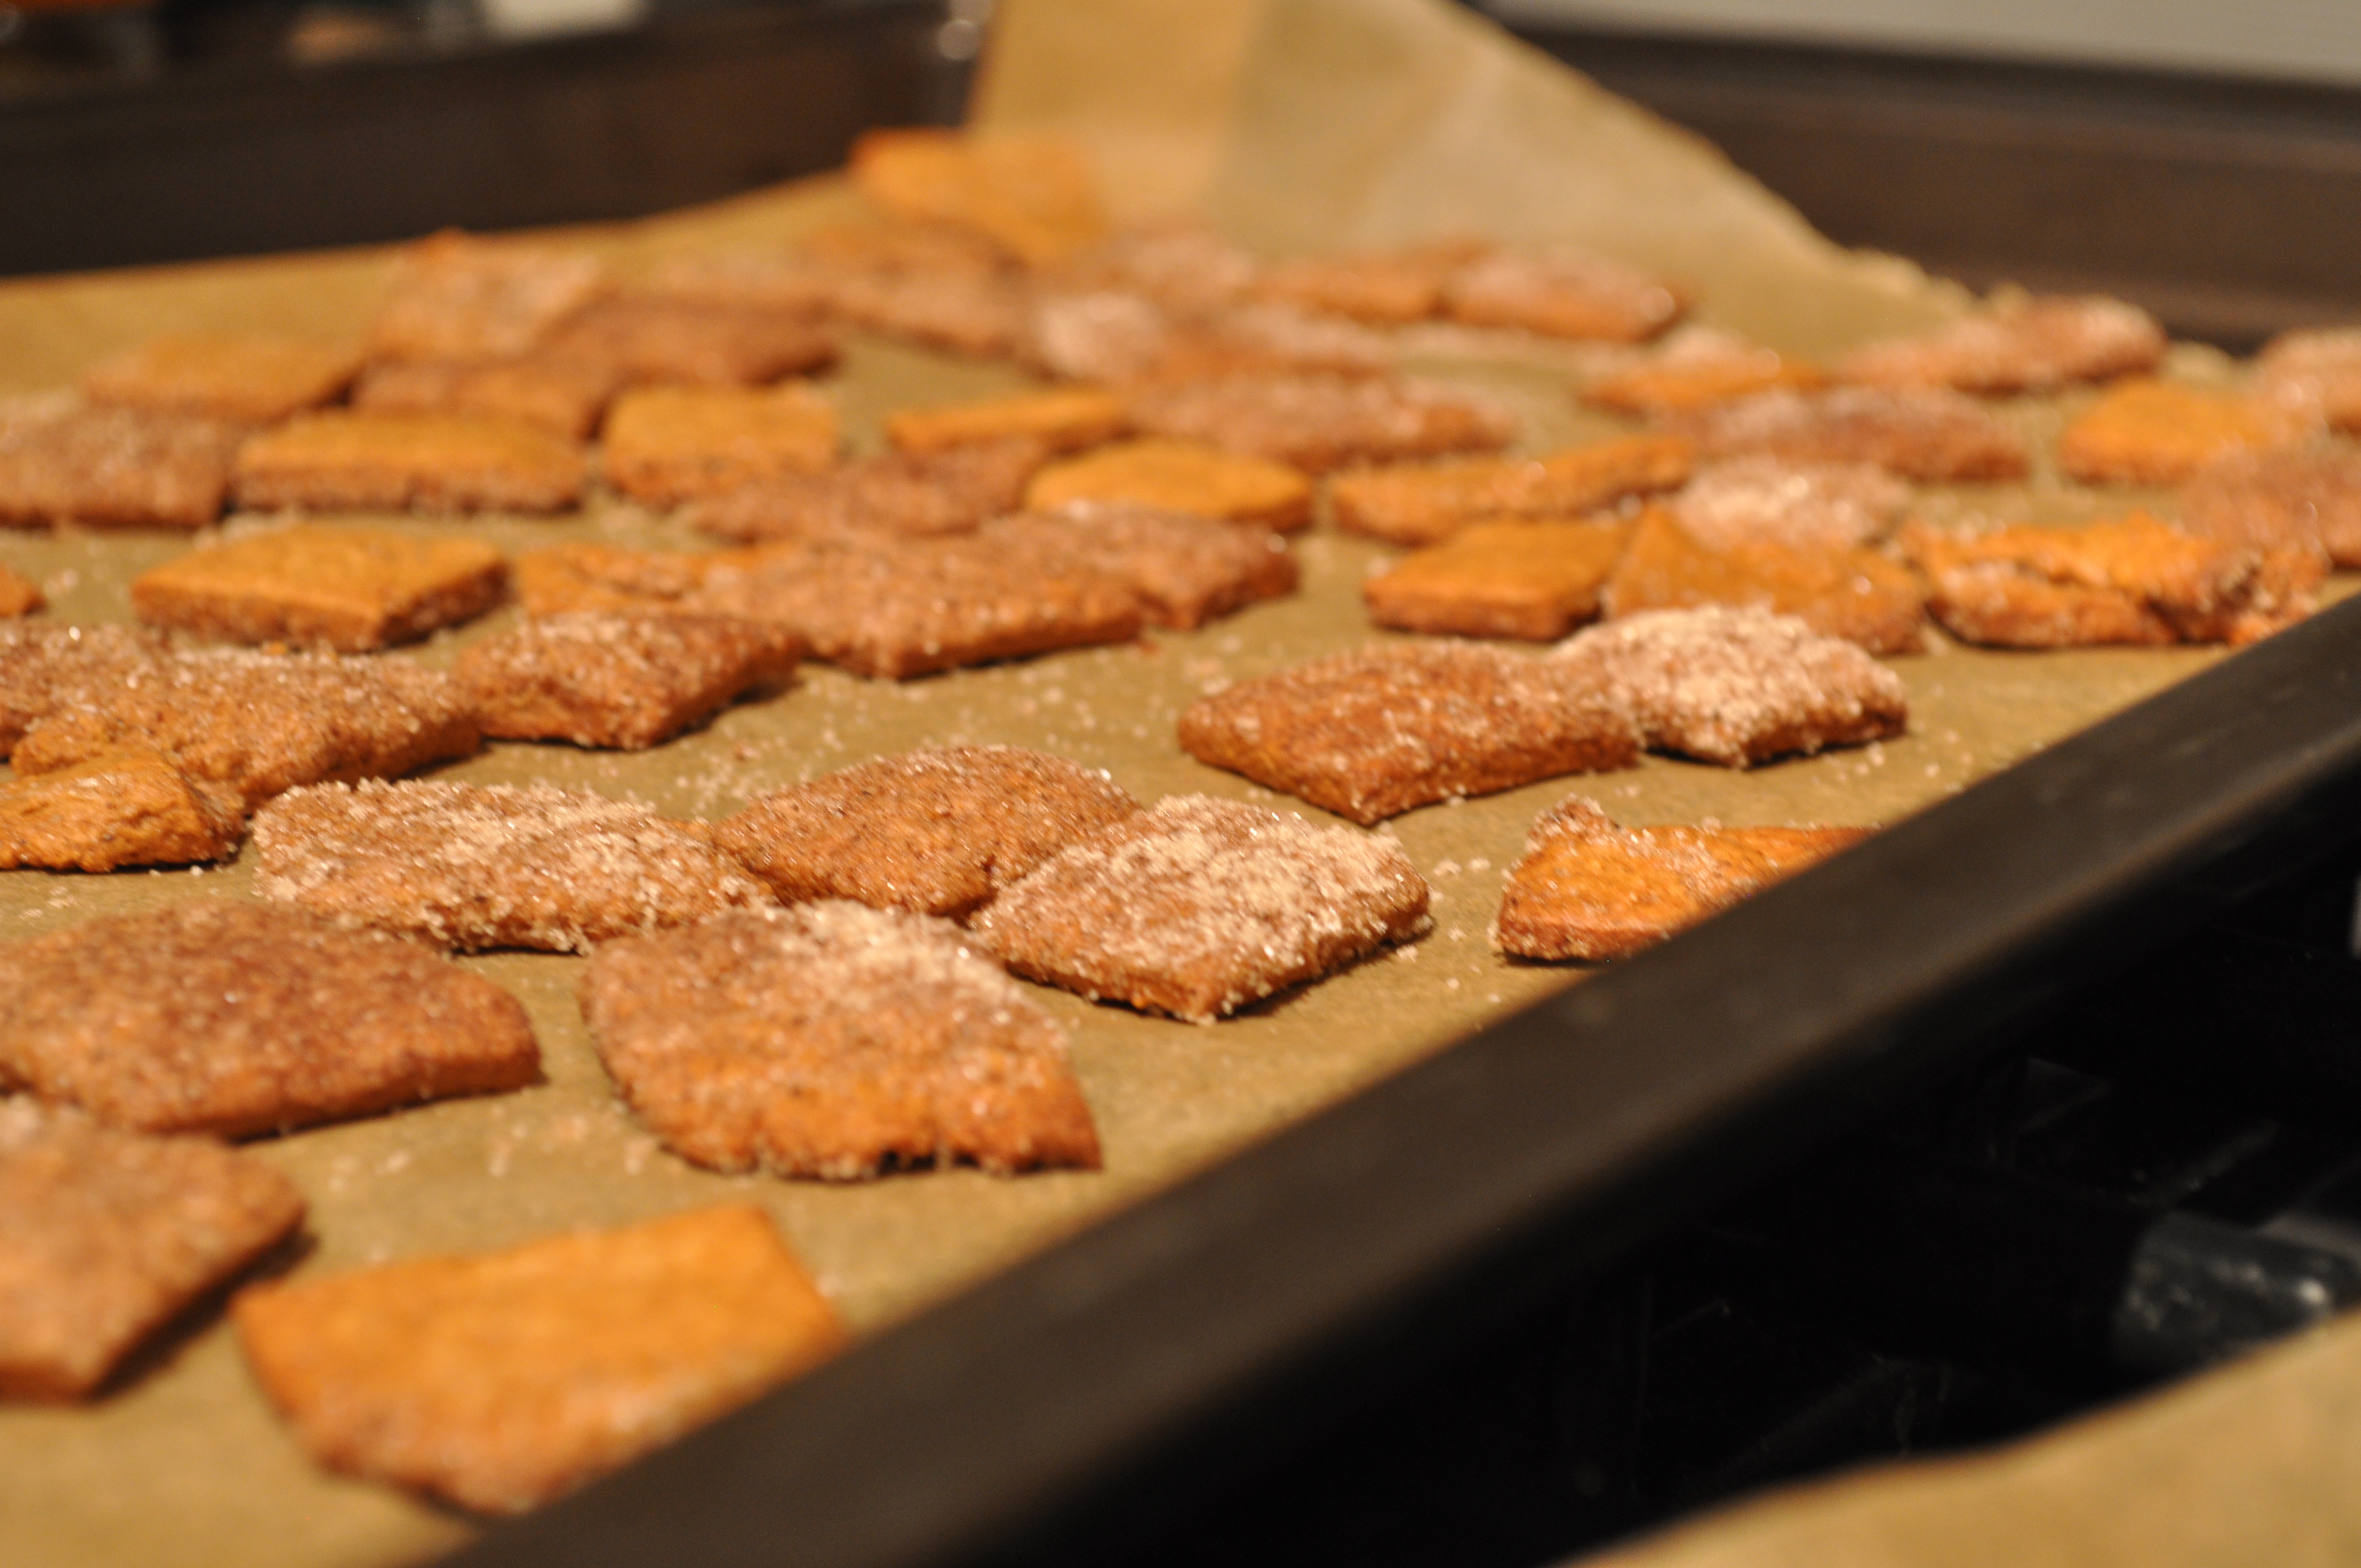
Stir batter again until smooth, and then divide the batter in prepared pans.  Because I have no idea how many cake pans you keep in your house, and what size these pans are, you basically want enough batter to come up about 1/4 inch in the pan when spread out.  For my 10 inch cake pans, it was a ladle-full, which means nothing to you, but which I’m guessing is right around a cup of batter.  Tilt cake pans around to let batter cover entire bottom. Bake cakes until barely browned, about 15 minutes.   Mine took exactly 15 minutes – I even stopped looking when it was my 3rd batch in the oven – but make sure you keep an eye on them.  They are thin cakes, and have the potential of baking quickly.  Let cakes cool for 10 minutes in pans, and then invert onto wire racks to cool completely. Clean and dry pans, and grease and flour again; divide remaining batter among pans, take a deep breath, and repeat baking process.

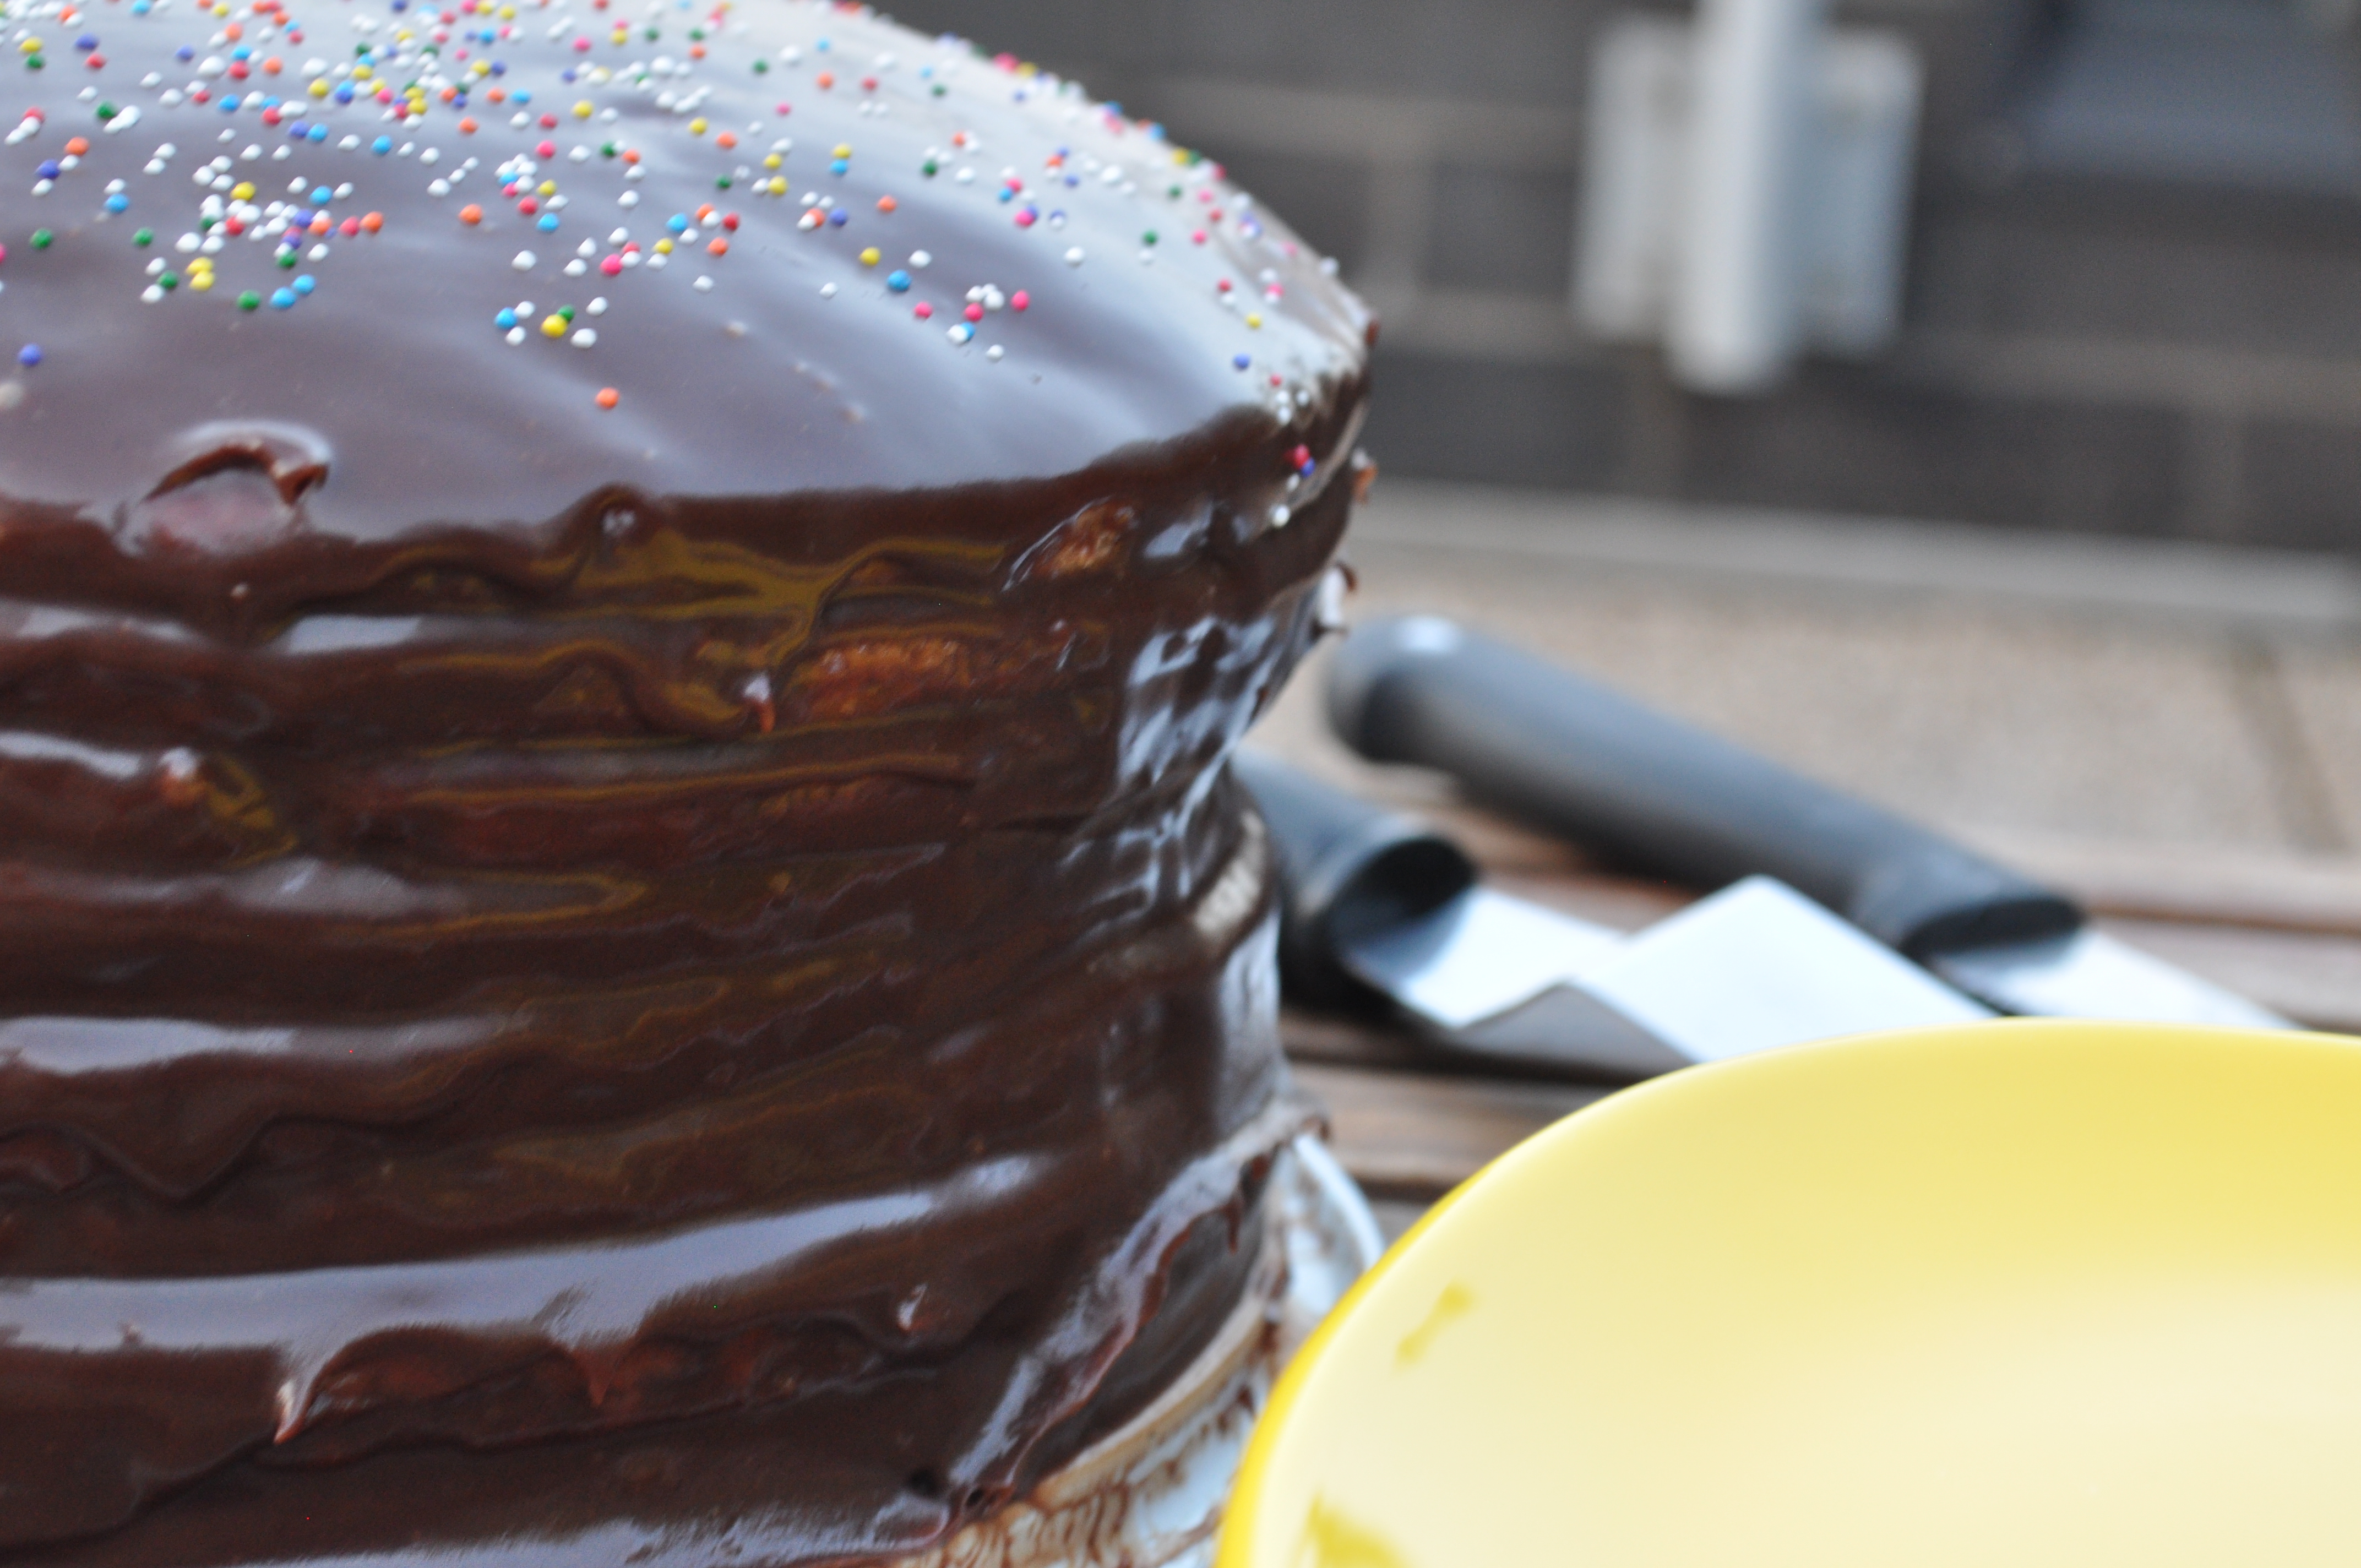
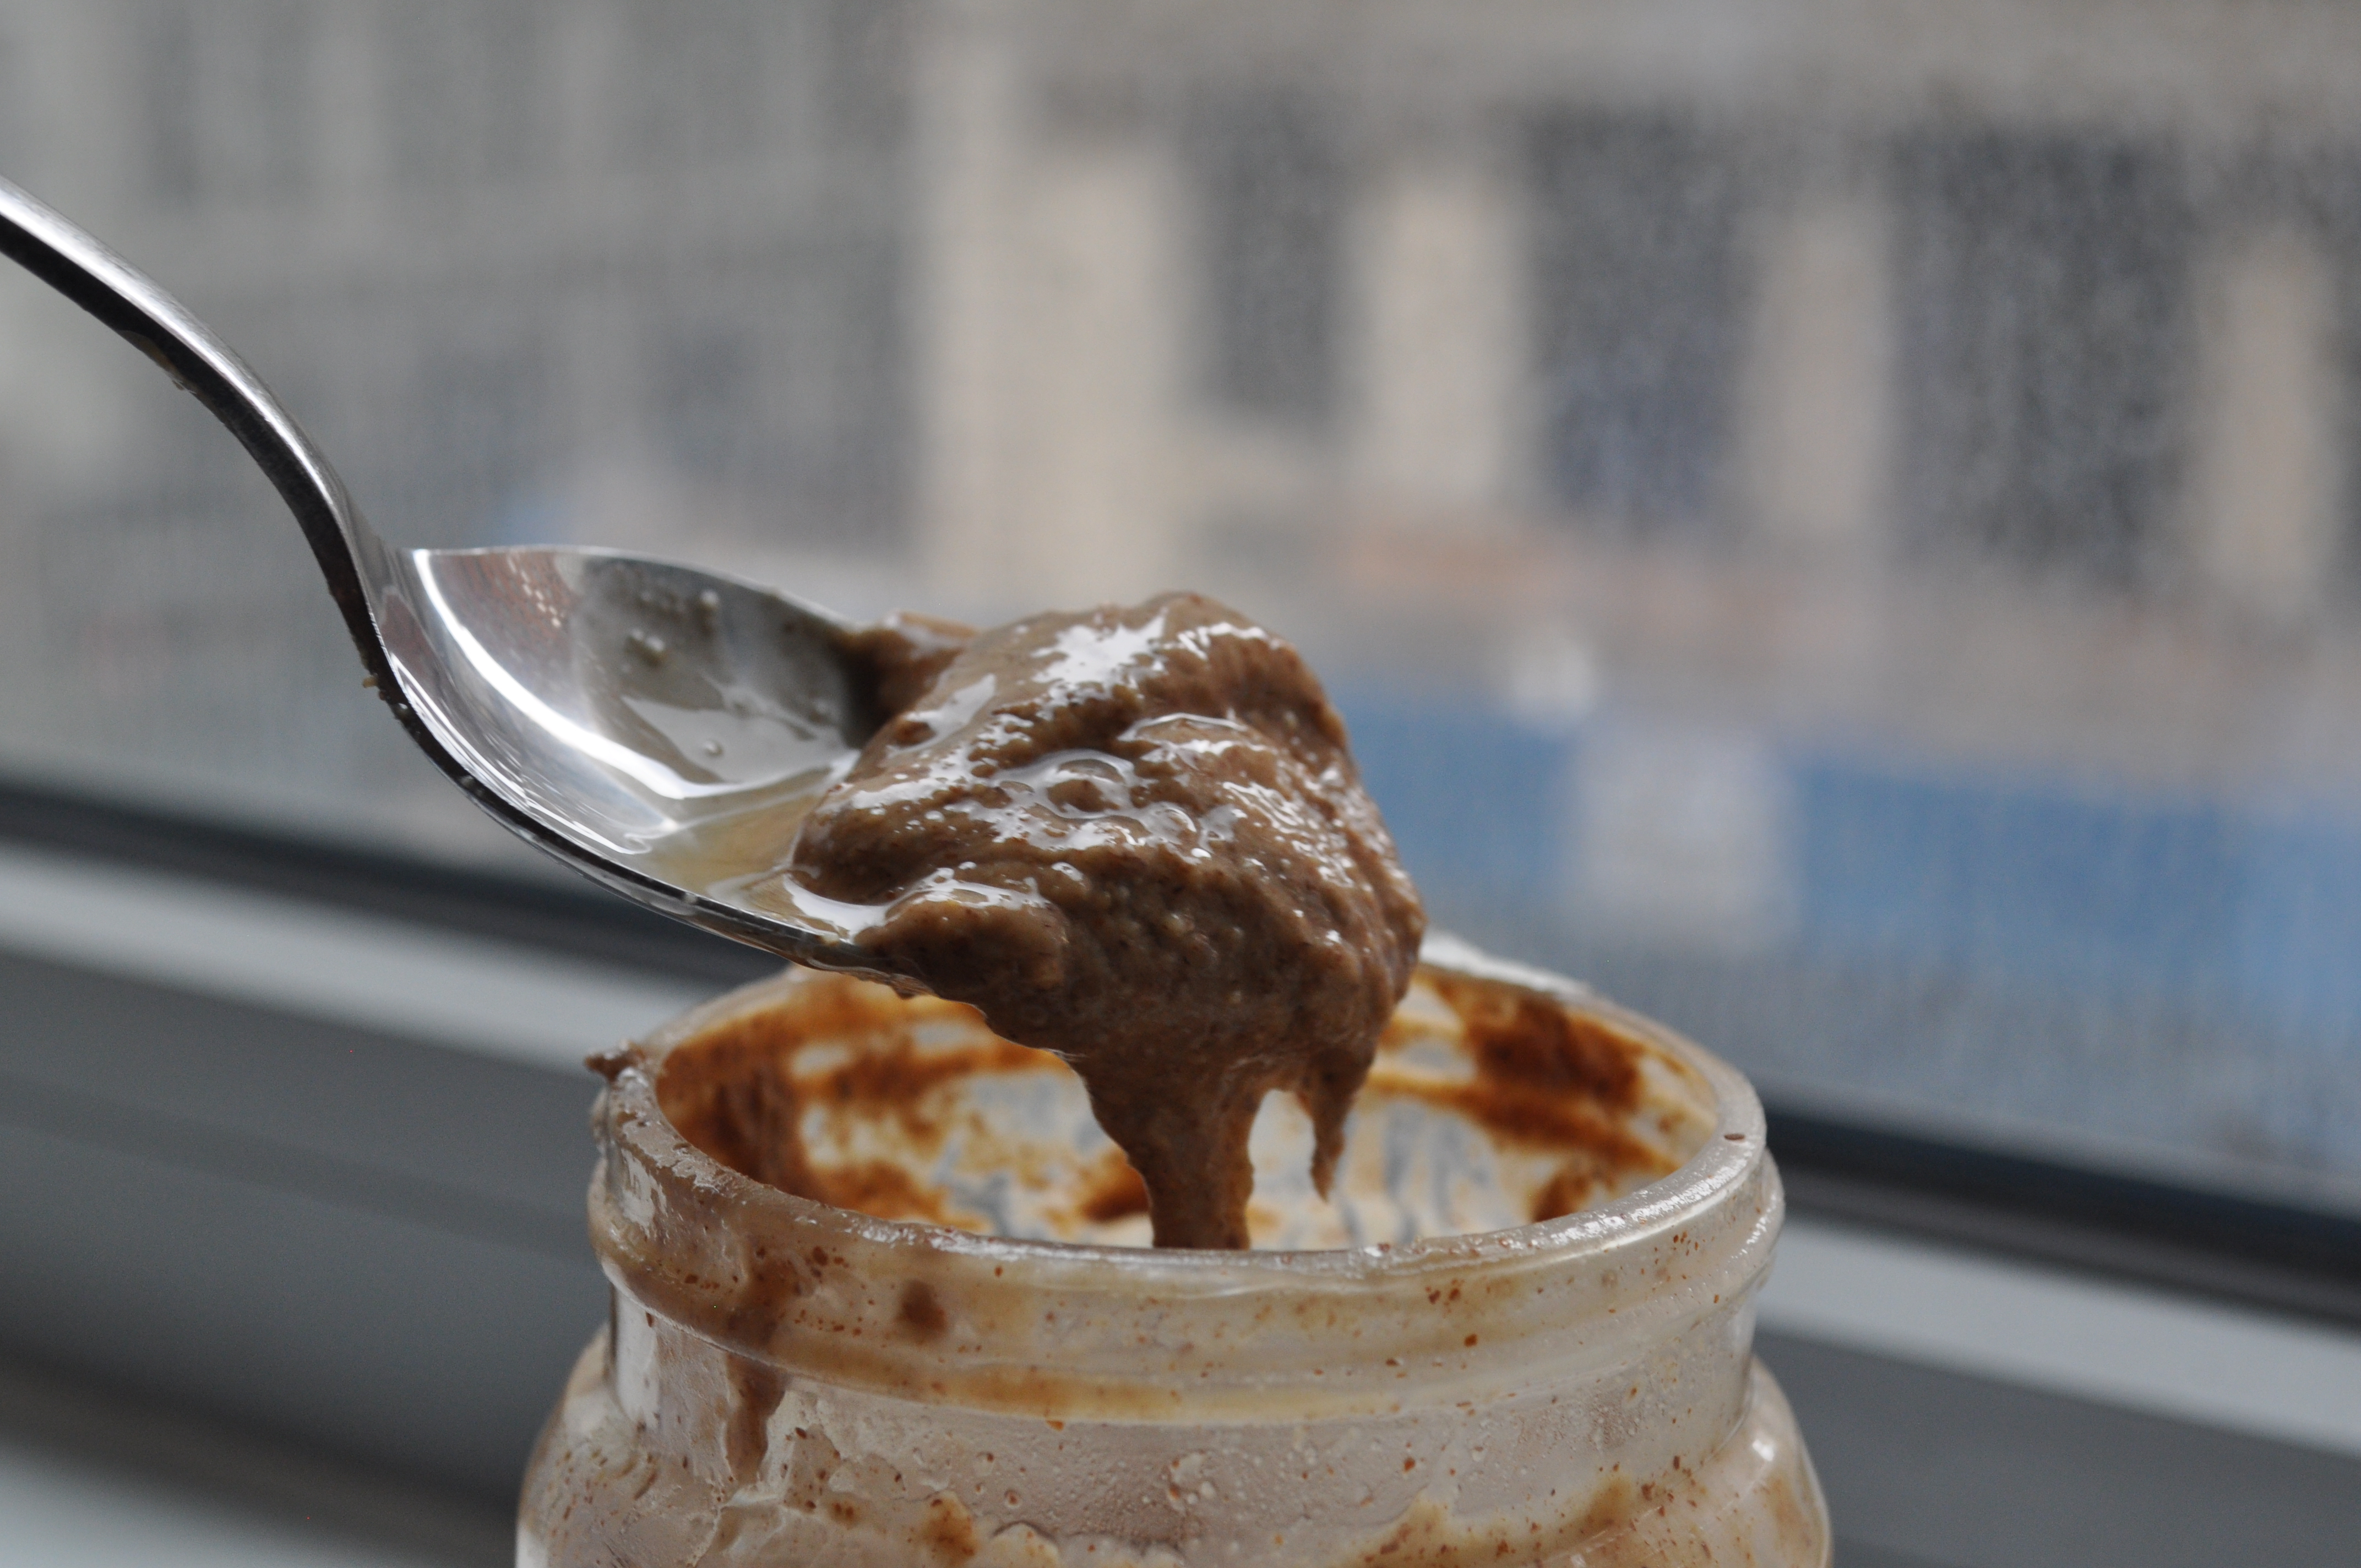
2. Make the icing and assemble the cake: Bring both chocolates, sugar, milk, and butter to a boil in a 6-qt. saucepan over medium-high heat; cook, stirring often, until sugar dissolves, chocolate melts, and mixture is smooth and shiny, which will take about 8-10 minutes. Remove from heat, and stir in vanilla; let icing sit until thick enough to spread, about 30 minutes.  I would stir it occasionally during those 30 minutes to speed up the cooling process.  Place one cake on a cake stand and, using an offset spatula, spread with 1/4 cup icing; spread to the very edge, otherwise the ends of the cake will be dry.  It’s okay if the icing drips off the cake – you’ll need to frost the sides anyway.  Repeat with remaining cakes, leaving top cake un-iced.  You may have to chill the cake to set the icing between cakes for about 10 minutes.  Pour the remaining icing right on top and spread to the side until it drips over.  Spread the icing all around the sides and the top until it is completely covered.  Refrigerate until ready to eat.

Baked Chocolate Glazed Doughnuts

October 3, 2013

IMG_0923

When I was in pre-school, I would love to celebrate birthdays in school.  First, I got to wear a crown.  Amazing.  Second, I was allowed to wear my favorite pink party dress.  Awesome.  But most of all, and this was true for any birthday, not just mine, was that someone would bring in Dunkin Donuts munchkins for breakfast.  My favorite!

DSC_0025

I could go on and on about how much I used to love these doughnut holes.  I loved that there were only four flavors so I didn’t really have to make a decision.  I loved that they came in a yellow portable container with a handle.  I loved that they were as small as I was at the time.  They were practically made for pre school birthday parties.

DSC_0027

My favorite of the four flavors was the chocolate glazed.  I mean, they were all delicious, and I don’t remember ever really discriminating, but if I got my hands on one of those chocolate ones, I was beyond happy.  It was perfect: cakey and chocolately with the crunch of a sugary glaze.  Mm, it was tasty.

DSC_0031

I could still go and get them, I know.  But alas, I’m old enough to make them now!  These were exactly like those bite sized wonders.  Except they are baked, and they are huge.  Because I feel like my food should match my size now, but I should keep that size in check.  Get it?  They’re baked.  Haha!.  Uh, nevermind, just make these.

DSC_0033

Baked Chocolate Glazed Doughnuts (adapted from Buns In My Oven)

For the donuts:
1 cup flour
1/2 cup sugar
1/4 cup cocoa powder
1/4 cup mini chocolate chip
1/2 teaspoon baking soda
1/2 teaspoon vanilla extract
1 egg
6 tablespoons yogurt
1/4 cup milk
1/4 cup vegetable oil

For the glaze:
1 1/2 cups powdered sugar
6 tablespoons whole milk
1 teaspoon vanilla

For the doughnuts:
Preheat oven to 375 degrees.  Spray a doughnut pan (or a muffin tin) with cooking spray.

In a medium mixing bowl, combine the flour, sugar, cocoa powder, chocolate chips, and baking soda.

In a small bowl, beat together the vanilla, egg, yogurt, milk, and oil.  Pour the wet ingredients into the dry and mix until just combined.

Spoon about 1.5 tablespoons into the prepared pan.  Spread to make sure they are evenly baked.

Bake for 8-9 minutes or until the tops spring back when you touch them.

Let the donuts cool in the pan for about 5 minutes.  Turn over onto a wire rack and let cool for an additional 10 minutes.  Dip each doughnut into the glaze (recipe follows), and allow to set on a wire rack.

For the glaze:
In a small saucepan over low heat, combine the sugar, milk, and vanilla until well combined. Remove from the heat.  Dunk the donuts in the glaze to fully coat and place on a wire rack to set.

Almond Butter Cookies

September 26, 2013

DSC_0023

The one drawback with having a food blog is that you almost never want to remake a recipe that you have already made.  It just doesn’t make good sense, really.  Why would I make something that is already photographed and posted when I know that new recipes are waiting to be made?!  It’s just inefficient, really.

DSC_2833

It turns out that inefficiency is the name of the game in my household.  Just in the last week, I managed to make these deliciously sticky sticky buns, followed by this creamy butter pecan ice cream, felt bad about both of those things, so then made a couple glasses of this green juice, which made me miss the sweetness again, so I remade these gloriously chocolately cookies.

DSC_0006

Whoops.  (I feel the need to tell you that I had guests in town next week.  I don’t know, I’m feeling a bit judged).

DSC_0011

I need a balance in my life, people!  So here is the new recipe.  A cookie that will satisfy all of my sweet tooth needs, but won’t break the calorie bank.  It’s egg-less, it’s refined sugar-less, and it’s (almost) butter-less.  I mean, as cookies go, this one is pretty virtuous.  But as virtuous cookies go, these are pretty tasty.  They’re cakey and they’re just barely sweet and they are just satisfying.  Oh, and you sprinkle some sea salt on top, so you feel fancy too.  I will more than likely be making these again, so this fixed…nothing.

DSC_0018

Almond Butter Cookies (adapted from 101 Cookbooks)

This recipe uses white whole wheat flour.  I wasn’t kidding about the healthy part.  White whole wheat flour, or whole wheat pastry flour is lighter than regular whole wheat flour.  But if that’s all you have on hand, go with 1/2 cup whole wheat flour and 1/2 cup all purpose flour.

1 cup white whole wheat flour

1/2 tsp. baking soda

1/2 tsp. salt

1/2 cup agave, or maple syrup, or golden syrup, or honey – whatever you want, but keep the sugars natural, people – we’re going for a theme.

1/2 cup natural almond butter

3 tbsp. butter, melted

1/2 tsp. vanilla

sea salt, for sprinkling

Arrange the oven rack to the top third of the oven.  Preheat oven to 350.

Combine dry ingredients in a small bowl.  Set aside.  In another bowl, whisk together butter, almond butter, agave and vanilla.  Pour the wet ingredients into the dry ingredients and fold together until just mixed.  Spoon out tablespoon-fulls onto a parchment paper-lined baking sheet.  Lightly sprinkle each cookie with sea salt.  Bake for 10-11 minutes, or until the cookies are just getting some color.  Let cool on baking sheet for 3 minutes, and then transfer to a wire rack to cool completely.

Apple Pie Yogurt Parfaits

September 17, 2013

DSC_2829

I’m pretty high maintenance when it comes to dinner or lunch.  I always want to try new things, find new recipes, and I hate having the same meal more than two times in a row.  I basically have no attention span, get bored very easily, and may even throw a tantrum.  I exaggerate.  Well, kinda.

DSC_2814

But the same isn’t true for breakfast.  For some reason, breakfast is the same everyday for years.  I mean, there may be some variation (yesterday I had my oatmeal with peanut butter instead of almond butter!), but mostly it’s the same.  And it’s mostly a bit mundane.  It’s the same for you too, isn’t it?

DSC_2827

Is it because it’s too early?  Is it because a fancy breakfast is saved only for special occasions?  Is it because we’re always running late?  Well, whatever it is, that is all about to change with these yogurt parfaits.

DSC_2820

No, I know, parfaits are nothing new to a breakfast table.  But cook the apples…in some butter…with some spices.  Let that  seep into thick Greek yogurt sprinkled with crunchy brown sugar.  And you basically have apple pie for breakfast.  (Or add some berries like the picture above, and it’s equally delicious).  It’s lovely, it’s easy, it feels like a special occasion, and most importantly, it’s different.

DSC_2832

Apple Pie Yogurt Parfait (adapted from Pioneer Woman)

2 cups Greek yogurt

1/4 cup heavy cream

1/2 tsp. vanilla bean paste, or 1 tsp. vanilla extract

1/4 tsp. ground cinnamon

1/2 cup light brown sugar

Mix together yogurt with cream.  Add in vanilla and cinnamon.  Spread the yogurt mixture out in a shallow bowl.  Evenly sprinkle the brown sugar on the surface of the yogurt.  Put in the refrigerator for 30 minutes.

1 apple, chopped

1 tbsp. butter

1/4 tsp. cinnamon

1/8 tsp. all spice

squeeze of lemon juice

biscotti, graham crackers or nuts

Melt the butter over medium high heat until melted.  Add apples and spices and sauté until the apples are fully coated.  Squeeze a squirt of lemon on top and keep stirring until apples are fully cooked but still firm, about 3-5 minutes.  Let cool completely.

Make parfaits: without mixing in the brown sugar, spoon out the yogurt into cups.  Layer with cooked apples and biscotti (or whatever you are using).  Keep layering, using 1/2 of the yogurt, and 1/2 of the apples.  Eat immediately.

Cinnamon Sugar Toast Ice Cream

September 5, 2013

DSC_2807

This is a nice little transition ice cream, isn’t it?  The deeply spiced flavors of the fall, with the cold, melting prone dessert of the summer!

DSC_2791

But this is actually a long time coming.  We were a tea and toast type of family growing up.  Our breakfast would be just that – perfectly spiced chai, with buttered toast.  On special occasions, my mom would sprinkle sugar on the toast, which was pretty much divine.  You didn’t even need to toast the bread!  Plain white bread with softened butter and sugar.  Seriously, give that a try!  I digress…

DSC_2795

This was all until my sister discovered a bottle of cinnamon sugar in the spice section of the grocery store.  She asked my mom to buy it (to credit my mom, she said that we could just mix the two together at home, but we claimed that we wouldn’t know the “recipe”…man, moms really do have a lot of patience, don’t they?), and then showed me how cinnamon sugar is meant to be used: also on the buttered toast that we had for breakfast!  I loved it.  The only problem was that it just didn’t pair well with our morning chai.  Too much spice going on.  What I always wanted was that cinnamon sugar toast with a glass of milk, warm or cold.

DSC_2796

Why I never had the two together is beyond me.  But this is it, people.  I finally did it.  This is the milky cinnamon sugar toast combo that I have always wanted.  It has that distinct combo of spice, sugar and butter.  This is your next breakfast.

DSC_2804

Cinnamon Toast Ice Cream (adapted from Epicurious)

There are two fancy things going on here that I would do without: first, I used good country white loaf bread.  From a bakery.  Cut thick.  See picture above.  Sounds great, right?  Mistake.  I think that regular ol’ sliced white bread would be much more manageable in the this ice cream.  Also much more recognizable.  Do that instead.

The second is that this recipe called for molasses, and even though I know that a basic recipe of cinnamon sugar toast doesn’t have molasses in it, I still used it.  Mistake 2.  It adds a great depth of flavor, actually, especially as the ice cream sits for a couple days.  I dare to say that it even takes on a coffee or chocolate flavor.  But again, not the flavor of cinnamon toast.  You could do without this as well to get the clean tastes of cinnamon, sugar, butter and bread.  Mm.

  • 2 cups whole milk
  • 2 (3-inch) cinnamon sticks
  • 5 slices firm white sandwich bread
  • 1/2 stick (1/4 cup) unsalted butter, melted
  • 2 tablespoons packed light brown sugar
  • 1/2 teaspoon ground cinnamon
  • 1/4 tsp. salt
  • 1/2 cup granulated sugar
  • 1/4 teaspoon molasses, optional (see note above)
  • 1 cup heavy cream
  • 1/2 tsp. salt

Bring milk and cinnamon sticks to a boil in a 2-quart heavy pot, then remove from heat and let steep, covered, 30 minutes.

While milk steeps, put oven racks in upper and lower thirds of oven and preheat oven to 300°F.

Cut 3 slices bread into 1/4-inch cubes and transfer to a bowl. Quarter remaining 2 slices and pulse in a food processor to make bread crumbs. Whisk together butter, brown sugar, ground cinnamon and salt in another bowl. Drizzle 3 tablespoons butter mixture over bread cubes and stir to lightly coat. Spread in 1 layer in a shallow baking pan. Add bread crumbs to remaining butter mixture and stir to evenly coat. Spread crumbs evenly in another shallow baking pan.

Bake bread cubes and crumbs, stirring occasionally and switching position of pans halfway through baking, until golden brown and crisp, about 30 minutes total. Cool in pans on racks, then transfer bread crumbs to a bowl.

Pour the milk over bread crumbs and let stand 10 minutes. Pour milk through a fine-mesh sieve into saucepan, pressing hard on solids, then discarding them.

Whisk granulated sugar, molasses, if using, and salt in a bowl.  Stir in cream.  Add the milk and whisk.

Refrigerate until mixture is completely chilled – at least 2 hours, preferably overnight.  Freeze custard in ice cream maker until almost firm. Fold bread cubes into ice cream, then transfer to an airtight container and put in freezer to harden.

Nectarine Shortbread

August 29, 2013

DSC_2782

I have been going to the farmers market a lot in the past week.  Yes, of course it’s partly because I know summer is ending and I’m just sad.  But also it’s because I waited too long this year.  Oh sure, I picked up some fruit here and there.  But I waited and waited for the best plums to come in, the sweetest peaches, the ripest pluots.  I just kept thinking that better ones will come in later in the summer and I should wait to buy them.  Well, later became July, then August, and here we are, literally days away from September, and what did I find out?  I waited too long, my friends.  Because the last time I went to the farmer’s market, I think I saw a pumpkin.  I looked away very quickly so I can’t confirm, but it was big and orange, and who am I kidding, it was a pumpkin.

DSC_2766

I panicked.  I would have to make up for a whole summer full of fruit in the week of summer that is left!  Well, friends, I did.  And my kitchen is full of all kinds of stone fruit!  And while I was at it, I picked up some berries.  And watermelon!  (And some tomatoes, corn and zucchini!)  A whole summer harvest is in my kitchen!

DSC_2758

Well, as you may know, fruit does go bad after a few days.  And as you may or may not know, I am unable to eat 7 pounds of fruit a day.  Solution?  Nectarine shortbread!

DSC_2772

Seriously, it’s actually brilliant because these keep!  Because it’s a cookie!  Stick them in the refrigerator and you’ll have summer goodness for a good 10 days!  Just learn to time things better than me.

DSC_2777


Nectarine Shortbread (adapted from Smitten Kitchen)

1 cup (200 grams) white sugar
1 teaspoon baking powder
2 3/4 cups plus 2 tablespoons (360 grams)
1/2 teaspoon cinnamon
juice of 1/2 lemon
1/4 teaspoon salt
1 cup (2 sticks) browned butter, directions follow
1 large egg
4 nectarines, pitted and sliced about 1/4 inch thick

Brown your butter: Melt butter in a small pot over medium-low heat.  The butter will first melt, then foam, then turn clear golden and finally start to turn brown and smell nutty, with little brown bits on the bottom.  Stir often, scraping the bottom of the pot.  The brown bits will indicate that the butter is browned.  Take it off the heat, pour it into a heat proof bowl, and place in the freezer for about 30 minutes, or until chilled thoroughly.

Preheat the oven to 375°F.  Spray a 9×13 inch pan with cooking spray.  In a medium bowl, whisk together sugar, baking powder, flour, salt and cinnamon.  Whisk in the egg into the chilled butter.  Pour the liquid mixture into the dry ingredients and gently stir together with a rubber spatula until it comes together.  Remove 1/3 cup of the dough and reserve.  Press the rest of the dough evenly into the bottom of the prepared pan, pressing firmly.  Line the nectarine slices in a single layer over the pressed dough.  Juice the 1/2 lemon over the nectarine slices.  Scatter remaining 1/3 cup crumbs evenly over nectarines and bake in preheated oven for 30 minutes, until top is slightly brown and you can see a little color around the edges. Cool completely in pan before cutting into squares.


Triple Chocolate Cookies

August 22, 2013

DSC_2741

DSC_2755

DSC_2752

DSC_2730

DSC_2735

Sometimes you just need a little chocolate…

Triple Chocolate Cookies (recipe from Pioneer Woman)

  • 2-1/2 sticks softened butter
  • scant 2 cups sugar
  • 2 eggs
  • 3 teaspoons vanilla extract
  • 2 cups flour
  • 3/4 cups cocoa powder
  • 1-1/2 teaspoon baking soda
  • 1 teaspoon salt
  • 1-1/2 cup semi-sweet chocolate chips
  • 2 cups white chocolate chips, divided

Preheat oven to 350°F.  Line a baking sheet with parchment paper.

Sift together all of the dry ingredients: flour, cocoa powder, baking soda, and salt.

Using a stand mixer or handheld mixer, cream butter and sugar until fluffy, scraping the sides – about 2-3 minutes.

Add eggs one at a time, beating after each addition.  Beat in vanilla extract.

Add the dry ingredients in 3 batches to the bowl, mixing until just combined after each addition.

Fold in the chocolate and 1 3/4 cups white chocolate chips.

Scoop out tablespoon portions on baking sheet.  With the remaining 1/4 cup of white chocolate chips, dot the top of each cookie with 3 chips.  Bake for 10-12 minutes or until cookies are barely done but still soft and chewy.  Let sit on baking sheet for about 2-3 minutes.  Transfer to wire rack to cool completely.