Archive for March, 2011

Cheeseless Mac and Cheese Florentine

March 31, 2011

Okay, I get it.  No one really craves cheese-less macaroni and cheese.  All you’re left with is macaroni and…  But this little number is something different.  It has all of the delicious qualities of a standard mac and cheese, the gooey-ness, the creaminess, even the cheesiness, believe it or not, but without the actual cheese.  I can see that you’re not sold yet.

White beans and cashews blended up together are what makes the consistency so cheese-like.  But then it has all the flavors of a normal mac and cheese – dried mustard, onions, breadcrumbs, the works.  It’s pretty much a win/win – a protein and vegetable filled, cholesterol-free (bonus!) dish, disguised as the comforting form of mac and cheese.  You’re craving it a little bit now, I can tell.  Make some and see if you ever go cheese-full again!?  Okay, that’s not a challenge.  Everyone loves cheese.  But you know what I mean.

Calling all requests! I did a bit of spring cleaning this week.  Great for the swim cap I thought I had lost 6 months ago.  Bad for me realizing that I have over seventy cookbooks and magazines that I never turn to whenever I want to find a recipe.  The internet has been my source for recipes and my cookbooks have been left for my bedtime reading (I like the pictures).  But no more!  I am challenging myself not to buy a single cookbook or magazine until I have tried something from every readable source that I have.  And I need your help!  Tell me anything you’d like to make – savory, sweet, brunch, dessert, vegan, gluten-free, really anything.  And I will make it my mission to find a cookbook recipe, put my spin on it, if need be, and post as many as I can.  Everyone wins!

Mac and Cheese Florentine (adapted from Fresh from the Vegetarian Slow Cooker)

8 oz elbow macaroni
10 oz package of frozen chopped spinach, cooked as directed, and drained
2 tablespoons olive oil
1 medium onion, chopped
1/2 cup raw cashews
1 and 3/4 cups water
1 can white beans, rinsed
1 and 1/2  tbl. miso paste
2 tsp. lemon juice
1 tsp. dry mustard
1/2 tsp. cayenne pepper
1/2 tsp. garlic powder
1/4 tsp nutmeg
2 tsp. salt
2 tbsp. butter
2/3 cup dry bread crumbs
1.  Preheat oven to 350 degrees.  Cook macaroni for 6 minutes in boiling water.  Drain and add spinach.  Toss to combine.
2.  Saute chopped onions in the oil over medium high heat.  Cook for 7-8 minutes, until translucent, but not brown.  *Do not salt the onions!
3.  Grind cashews in food processor. Add 1 cup of water and blend. Add cooked onions, white beans, miso paste, remaining 3/4 cup water, lemon juice, dried mustard, cayenne, nutmeg, garlic powder and salt.  Blend again until smooth.  Taste and adjust the spices as necessary.  Pour bean/cashew sauce over the cooked macaroni and spinach.  Mix until well combined.
4.  Pour mixture into lightly greased casserole dish.
5.  Melt butter in a pan, over medium-low heat.  Add breadcrumbs and toast until browned and fragrant.  Spread on top of casserole.  Bake for 30 minutes until brown and bubbly.  Let sit for 5 minutes before digging in.

Vanilla Almonds and Coconut Candies

March 22, 2011

Spring’s here!  Which leads to the obvious question of: Is it too early to start thinking of holiday treats?  I understand that the weather is getting warmer and that we have all been craving this time of year, but I recently made two yummy things that epitomizes holiday food gifts: small, portable, easy to make, delicious and holiday-flavorly.  Yes, that’s a word.

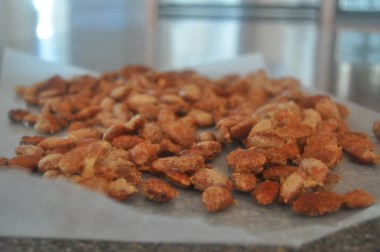
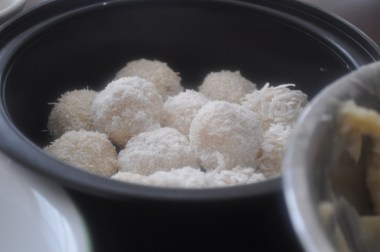
The genius, just-thought-of thing about holiday treats is that they also double as picnic foods!  Try them now, make them again in December and you have yourself a win/win.  The almonds are these sweet salty, crunchy goodness that smell amazing like those sold on the street.  No, really.  A-mazing.  And these coconut candies were so good that my mom actually split all of them in half and had them once a day just to make sure that they last longer.  And if that doesn’t convince you to make these treats, then you’re simply a Grinch.  So with that, I wish you and yours a very happy spring!

Vanilla Almonds (adapted from Kelsey’s Essentials)

Ingredients

  • 1 egg white, beaten
  • 1 teaspoon vanilla extract
  • 2 cups whole almonds
  • 5/8 cup sugar
  • 1/4 teaspoon salt
  • 1/2 teaspoon ground cinnamon

Preheat the oven to 300 degrees F. Beat the egg white with the vanilla extract.  Add the almonds to the egg white mixture and stir to coat.  In a separate bowl, combine the sugar, salt, and cinnamon.  Mix into the almonds.  Spread the almonds in a single layer on a greased baking sheet.  Bake for 20 minutes.  Remove and cool completely on wax paper.  Break into clusters and store.

Coconut Candies (adapted from NY Times)

  • 1 cup condensed milk
  • 1/2 cup coconut milk
  • 2 tbsp. unsalted butter
  • 2 teaspoons honey
  • 1.5 cups finely shredded unsweetened coconut

In a medium-size heavy saucepan, combine condensed milk, coconut milk, butter, honey, and 1/2 cup shredded coconut.  Bring to a boil over medium heat.  Reduce heat to low and whisk constantly until fudge-like, 15-20  minutes.  When mixture is ready, it will pull together.  Pour mixture into a bowl and let cool to room temperature; refrigerate until firm, at least 2 hours.  Scoop out teaspoonfuls of the mixture and use your hands to roll into balls, about 3/4-inch in diameter. Set aside on a baking sheet.   Place remaining 1 cup coconut in a wide bowl.  Roll 4 to 6 candies at a time in remaining coconut, covering surface completely. Store in an airtight container at room temperature for 2 days, or refrigerate for up to 1 month.  Serve chilled.

Whole Orange Cake

March 16, 2011

On the spectrum of fruits that I enjoy, oranges come somewhere in the middle.  They are nowhere near the top with summer berries and mangoes, but I wouldn’t put them on the bottom with honeydew and cantaloupe either (can we talk about how disappointing restaurant fruit salads are when they are filled with melons??).  It’s not that oranges are not tasty; it’s just that they’re not always consistent.  Plus, let’s be honest, they just seem far too labor intensive to eat when the flavor is hit or miss.


That is until I discovered honeybell oranges.  They are the one and only exception when it comes to oranges.  Every year, right in the dead of winter, my parents send us a carton of honeybell oranges.  These oranges are only available for a short time during the year, but are seriously the juiciest, most flavorful oranges that I have ever encountered.  For someone who is typically so blasé about oranges and thinks that they are just mediocre in the fruit chain, the discovery of honeybell oranges was a very big deal.


This year, I may have expressed more excitement than usual because my parents did not think that 4 cartons of oranges would satisfy my need.  They sent us EIGHT cartons of oranges – I was left with NINETY-SIX oranges!  Huge, juicy, can’t-eat-more-than-one-at-a-time oranges!


After my initial shock, denial and disbelief, I gathered myself together, found space for the oranges in my apartment, and decided that this is a very good thing.  Instead of just using the oranges for fresh-squeezed juice in the morning, as a daily snack in the afternoon and as a replacement for milk in my oatmeal (have you ever tried that?  fruity and divine – try it), I realized that I could use these incredibly flavorful oranges in my baking.  I found a cake that used the entire orange, skin and all (no peeling involved!).  It was moist, light, and incredibly orange-y.  And in my unintentional effort to post gluten-free desserts, here’s one more for the list!

Whole Orange Cake (recipe from Scandi Foodie)

I added mini chocolate chips to the cake batter because I truly believe that the orange/chocolate combo is one of the best, but feel free to leave it plain, or add nuts, perhaps.  Also, I was nervous that the bits of orange peel would leave a slight bitter taste.  It did.  Not unpleasantly, but it was there in that marmalade kind of way.  But if you happen to plan in advance, this is one of those cakes that develops more flavor as it sits, and will lose any of that even slight bitter taste.

Ingredients

2 oranges
3 eggs
1 cup sugar
3 cups almond meal
1 tsp baking powder

1 cup mini chocolate chips, mixed with 1 tbsp. flour (gluten-free or otherwise)

Method

Wash the oranges, place them in a large saucepan and cover with water. Bring to boil and simmer for 15 minutes. Drain, then return to pan, cover with water and bring to boil. Let simmer another 15 minutes.  Meanwhile, preheat oven to 325 degrees.  Drain and chop the oranges discarding any seeds.

Place the oranges in the bowl of a food processor and process until smooth.

Whisk the eggs and the sugar until thick and pale. Add the orange, almond meal, and baking powder and fold until just combined. Add the chocolate chips/flour mixture and fold in.  Pour into a greased, 9 inch round or springform pan and bake for about 45 minutes or until tester comes out clean.

Mini Peanut Butter Chocolate Chip Cookies

March 8, 2011

Do you have peanut butter?  An egg?  How about sugarbakingsodavanillaminichocolatechips??  I knew you would have these things on hand!  Because that’s all it takes to make the most delicious peanut butter chocolate chip cookies ever.  I’m not kidding, people.

Here’s the kicker, though.  I didn’t have all of those ingredients on hand.  Well, I did, but not nearly enough.  So I decided to trick the mind and make these cookies miniature instead.  Friends, a lesson: if you decide to make cookies in bite size so it actually looks like you’ve made more than you have (thinking that they will last you longer), you actually end up with having to make cookies sooner than expected because people eat them so fast!  Fact.  Seriously, people were so drawn to these little cookie-lets.  They flew out of my cookies jar, handfuls at a time, just because they were so small!  There is apparently no guilt factor when eating a miniature cookie…or, apparently, 30 of them.

But it wasn’t just their size – these cookies were so appealing because they were just so…cute.  That’s exactly the appeal of these cookies.  They’re cute, and they’re small, and most importantly, they represent “portion control”.  But they’re also soft and crumbly and my goodness, so yummy.   Make them for their ease, make them for their cuteness, but please just make them and go crazy.  Everyone around you sure will.

Mini Peanut Butter Chocolate Chip Cookies (adapted from Joy the Baker)
Ingredients
1 cup natural peanut butter
1 cup sugar
1 egg
1 teaspoon baking soda
1 teaspoon vanilla
3/4 cup mini chocolate chips
Method
Preheat oven to 350 degrees.  Line a baking sheet with parchment paper and set aside.  Using a mixer combine peanut butter and sugar until well combined, about 2 minutes.  Add egg, baking soda, and vanilla and mix for another 2 minutes.  By hand, mix in mini chocolate chips.  Roll into teaspoon sized balls and place onto prepared baking sheet.  Bake for 7-8 minutes, until they look dry and lightened in color.  Let cook on baking sheet for a minute.  Carefully press each cookie down with a fork.  Continue to cool on baking sheet for an additional two minutes, then transfer to a wire rack to cool completely.