Archive for the 'Uncategorized' Category

Chocolate Chip Cheesecake

April 24, 2014

DSC_0219

I don’t remember a time in my life when I did not know about cheesecake.  For as long as I can remember, I have always known the dessert with the smooth, creamy filling.  The dessert that is called a cake but isn’t like cake at all.  My mom used to make cheesecake and pumpkin pie every single New Year’s Eve.  Two of each, actually!  It was just a thing she did.  And my dad would go on business trips to New York and bring back croissants and a piece of cheesecake each for me and my sister.  A charmed life, I have led.

DSC_0217

Which is exactly the reason I wonder why I don’t make cheesecake more often.  It must be the grandness of it.  It’s big (as in the actual size), it’s heavy (it’s not a dieter’s dessert, people), and it’s a bit of a show-stopper.  Cheesecake seems to be a dessert for special occasions.  Like New Year’s Eve!  And coming back from a trip to New York!

DSC_0209

I had been eyeing this recipe for a while.  But I just kept waiting until there was a good enough reason to make it.  Finally, I made this for a special occasion, and it was gone in an hour.  Flat.  And then I was sad I had no more cheesecake.  The irony is palpable.

DSC_0214

What I’m saying is that you actually should not wait for a reason to make this cheesecake, people.  Do it now.  There should be more cheesecake in your life.

DSC_0244

Chocolate Chip Cheesecake (slightly adapted from All Recipes)

For crust:

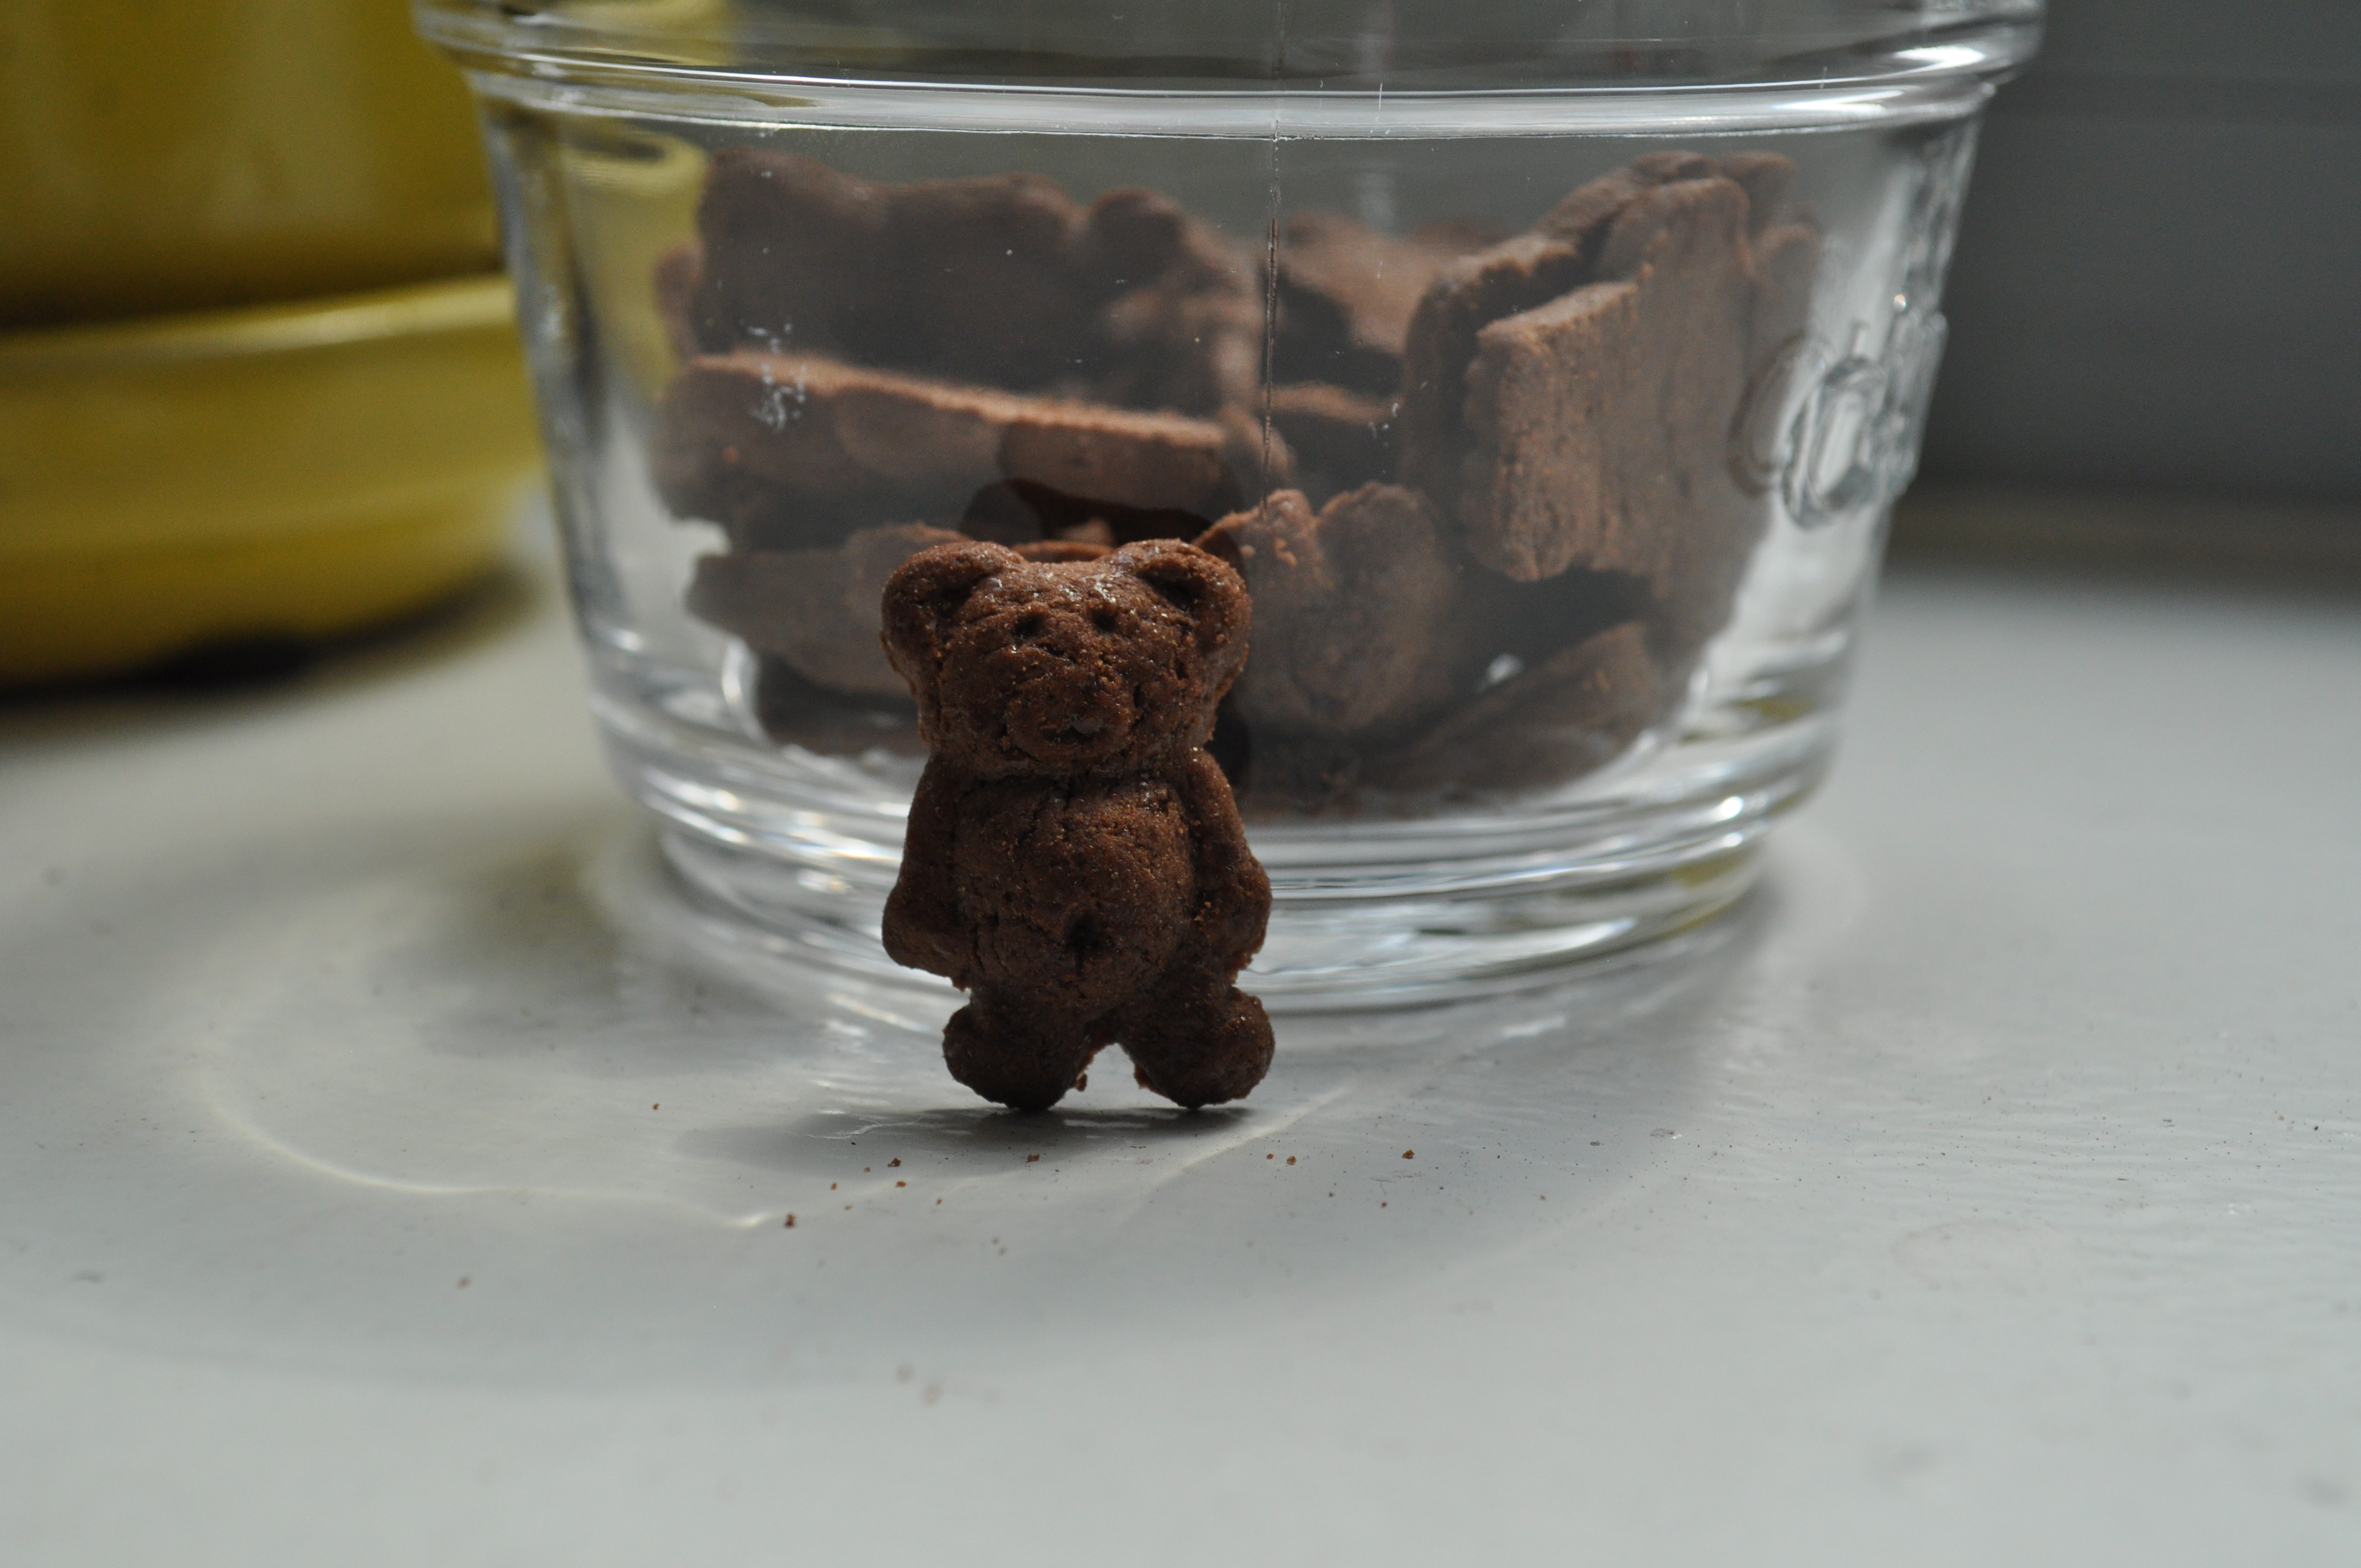
2 cups chocolate Teddy Grahams

scant 1/3 cup sugar

6 tbsp. butter, melted and cooled slightly

1/2 tsp. salt

Spray a 9 inch springform pan with non-stick cooking spray.  In a food processor (or in a Ziplock bag), whiz together the Teddy Grahams, sugar, and salt until they are fine crumbs.  Add butter and blend until it comes together.  Press evenly into the bottom and up the sides of the prepared pan.  Set aside.

For filling:

3 8 oz. blocks cream cheese, at room temperature

3 eggs, at room temperature

1 14oz. can condensed milk

2 tsp. vanilla extract

1 cup mini chocolate chips, divided

1 tbsp. all purpose flour

Preheat oven to 300 degrees.  Beat cream cheese with an electric mixer until smooth.  Add eggs, one at a time, until each one is well-incorporated.  Add condensed milk and vanilla and mix well.  Toss 3/4 cups of chocolate chips with flour until the chips are well coated.  Fold the chips into the batter until well distributed.  Pour into prepared pan with crust.  Sprinkle with remaining 1/4 cup of chocolate chips.

Bake for 1 hour, resisting temptations to open the oven.  At the 1 hour mark, turn off the oven and leave the cheesecake to cool in the oven for an additional hour.  Remove from oven and cool completely at room temperature.  Chill for at least 4 hours before serving.


English Muffins

April 17, 2014

DSC_0221

The thing about making usually store-bought things homemade is that you have a standard to adhere to.  So, for example, if you were to, say, make English muffins at home, people may start searching for those nooks and crannies.

DSC_0207

It’s all about managing expectations, people.  No, these did not have the same kinds of holes and wobbles to smear a pad of butter on.  But were they fluffy and delicious?!  Yes.  Did they look like an English Muffin?!  Yes!  Were you able to split them with a fork?!  If you tried really hard, yes, but, I mean, use a knife.  Do you really need anything else?  Well, nooks and crannies would have been nice.

DSC_0209

But I’m focusing on the positive!  Split these open, melt some cheese on both sides and stick an egg in the middle – no one will turn you away.

DSC_0213


English Muffins (recipe from A Beautiful Mess)

2 1/4 cups bread flour
1/2 tablespoon sugar
3/4 teaspoon salt
3 tablespoon butter, room temperature 
1 1/4 teaspoons active dry yeast
1/4 cup warm water
3/4 cup milk, room temperature

Combine the yeast with the warm water, and let sit for 5 minutes, until the mixture is foamy.

In a large mixing bowl combine the flour, sugar, and salt.  Mix in butter, and then the milk and yeast mixture.  Stir until a dough ball forms.  Knead until the dough is shiny and elastic: if using a stand mixer and dough hook to knead the dough, this will take about 6 minutes; by hand it will probably take 8-10 minutes.  Place in a lightly oiled bowl, cover with plastic wrap, set in a warm place, and allow to rise until doubled in size (about 60-90 minutes).

Line a baking sheet with parchment paper and lightly dust it with flour.  Dump the dough out on a lightly floured surface.  Divide the dough into 8 equal parts.

Roll each piece of dough into a smooth ball.  Cover loosely with plastic wrap, and allow to rise for an additional hour.

Preheat oven to 400 degrees.  Heat a cast iron skillet (or other oven safe pan), or just a regular non stick pan over medium heat. Add a teaspoon of oil or butter and spread it around to make sure that the muffins don’t stick.  In batches if pan is small, or all at one time, stick the muffins on the pan.  Cook for 3-4 minutes on each side until the muffins are golden brown on both sides.

Either stick the pan in the oven (or transfer back to the baking sheet), and bake for 10-12 minutes until cooked through.  Cool on a wire rack

Muddy Buddies

April 3, 2014

DSC_0213

People.  The name of this nostalgic childhood treat is called muddy buddies.  It’s also known as puppy chow.  And yes, I made it.  For you!

DSC_0206

What makes this worse is that this doesn’t even bring back any childhood memories for me.  Mostly because my mom wouldn’t have it.  You’re not making dog food in my kitchen, she once told me way back when.  Fair, I thought.  (And anyway, she had her own version of chocolate peanut butter cereal treats that were just fine by me.)

DSC_0209

And yet, here I am.  I made these anyway.  There was always something about this that I wanted to try.  Chocolate!  Peanut butter!  Cereal!  Nostalgia!  Ziplock bags filled with powdered sugar!  Basically, my top 5 favorite things.  How could this be bad?!

DSC_0212

I think that the most appropriate word to describe this is “addictive.”  But I’m sure you have all probably had these before.  They defy all logic – their name is so unappealing, their appearance equally so; but the reaction I got when I gave these away was pure (childhood?) joy.  And for that reason alone, you should make these muddy puppy chow buddies.

DSC_0218

Muddy Buddies (slightly adapted from the Chex website)

9 cups Rice Chex

1 cup dark chocolate chips

heaping 1/2 cup natural peanut butter

1/4 cup butter

1/2 tsp. salt

1 tsp. vanilla

1 1/2 cup powdered sugar

Place cereal in a large bowl.  In another bowl, microwave together chocolate chips, peanut butter, and butter in 30 second intervals, stirring after each time, until smooth and melted.  Add vanilla and salt to the chocolate/peanut butter mixture.  Using a rubber spatula and constantly stirring to make sure that the cereal does not break, mix in the chocolate mixture into the cereal until the cereal is evenly coated.  Divide in 1/2 and place in two 1 gallon ziplock bags.  Distribute 3/4 cups powdered sugar in each bag.  Seal top and shake the bag until the cereal is coated with powdered sugar.  Line two baking sheets with wax paper.  Pour cereal out on baking sheets to let chocolate harden and cool.

Vanilla Bean Poundcake (with a Vanilla Bean Glaze)

March 27, 2014

DSC_0223

I feel like this blog is aging slightly.  It already has 170 posts under its belt, and is 3.5 years old!  It’s really getting up there in blog years (which are measured very similarly to dog years), and I’m sad to say, it’s starting to show.

DSC_0208

Not in the most obvious way – it’s still looking as young and fresh as ever (right?!).  But when I think about what to post, I’m at a bit of a loss these days.  Cookies?  Been there.  Ice cream?  My winter coat has not even retired for the season.  And we all know that tarts are sprawled all over this blog.

DSC_0212

And then it hit me.  This whole time while choosing and making recipes for this blog, I have never once devoted a single post that highlighted dessert’s most basic, most reliable flavor.  It makes sense, really, growing up in a household that always considered vanilla to be optional.  But I have learned from my past and have come to realize that vanilla is the backbone of, well, everything.  And it deserves its own post!

DSC_0214

It also didn’t hurt that my sister sent me this kind-of life changing vanilla powder from Hawaii.  Let’s just call that inspiration.  And just like that, my blog got a second wind!  A vanilla face-lift of sorts.

DSC_0227

Vanilla Bean Poundcake (with a Vanilla Bean Glaze) (adapted from here)

For cake:

1/2 cup butter, softened

1 cup (200 grams) sugar

3 eggs, at room temperature

1/2 cup whole milk, at room temperature

1 tbsp. vanilla bean paste, or 1 vanilla bean, with the seeds scraped out

1 1/2 cups (188 grams) all-purpose flour

1 tsp. baking powder

1/2 tsp. salt

1/2 tsp. vanilla bean powder (can omit if don’t have)

For glaze:

1 cup powdered sugar, sifted

1 tsp. vanilla bean powder (or vanilla extract)

pinch of salt

2-3 tbsp. milk

For cake: Preheat oven to 350 degrees F.  Liberally butter and flour a regular bundt pan.  In a large bowl, beat together the butter and sugar until smooth and light, about 3 minutes.  Mix in eggs, one at a time, beating well after the addition of each.  In another bowl, sift together all of the dry ingredients of the cake.  Alternate mixing in the dry ingredients with the milk, mixing well after each addition, beginning and ending with the dry ingredients.  Stir in vanilla bean powder.  Pour batter into pan.  Rap pan against the counter a couple of times to settle.  Bake for about 30 minutes until tester comes out clean.  Let cool in pan for 15-20 minutes then invert onto wire rack to cool completely.

For glaze: mix together sugar, vanilla and salt.  Add milk, one tablespoon at a time until a thick, but pourable glaze is formed.  Add more milk, if necessary.  Pour over cooled cake.

Cinnamon Palmiers

March 13, 2014

DSC_0529

Elephants are my favorite.  They really are.  This love began in the 2nd grade when we each had to pick an animal and do an entire report on them.  And then present our reports!  In front of our parents!  With posters!  It was intense for the 2nd grade.

DSC_0524

But it was then that I fell in love with elephants.  I learned many things about them – elephants have a great memory!  Elephants are vegetarian like me!  And the way you tell apart Asian and African elephants is by the shape of their ears!  (Actually, now that I’m thinking about it, I’m sure that there are many things that are distinct about them, but this is what my 2nd grade self found.  And what my adult-self remembered).

DSC_0525

Yes, that’s right.  African elephants have ears that are shaped like the continent of Africa!  So smart, those elephants.  What does all this have to do with a pastry, you may ask?  Well, cinnamon palmiers (pronounced “pahl-mee-ays”), are also called elephants ears!  (Which results in me pronouncing them “pahl-mee-ears”).

DSC_0526

Make these sugary, caramelized, buttery treats and look at the shape to see where they are from!  They’re from France, actually.  You should just eat them and read about elephants instead.

DSC_0531

Cinnamon Palmiers (recipe from Food Network)

1 cup sugar, divided
1/8 tsp. salt
1/4 teaspoon cinnamon
1 sheet puff pastry

Preheat the oven to 450 degrees.  Line a baking sheet with parchment paper.

Combine 1/2 cup of the sugar and salt and pour it over a clean, flat surface.  Unfold the sheet of puff pastry onto the sugar mixture.

Combine 1/2 cup of the sugar and the cinnamon and spread it evenly on the puff pastry.  It should be a thick even coating of sugar.  With a rolling pin, lightly roll the dough until it’s a 13-inch square and the sugar is pressed into the puff pastry on top and bottom. Fold the sides of the square toward the center so they go halfway to the middle.  Fold them again so the two folds meet exactly at the middle of the dough. Then fold one half over the other half as though closing a book. You will have 6 layers. Slice the dough into 3/8-inch slices and place the slices, cut side up, on baking sheets.

Bake the cookies for 6 minutes, or until caramelized and brown on the bottom, then turn with a spatula (they will be hot!) and bake for another 3 to 4 minutes, until caramelized on the other side. Transfer to a baking rack to cool.

Chocolate Globs

March 3, 2014

DSC_0513

I’m not going to lie, friends.  The part of the recipe that I was attracted to most was the name.  Globs.  Any word like that – glob, blob, clump, cluster – any of those words preceded by the word chocolate – well, that’s just going to be delicious.  So delicious, in fact, that I was planning on making something much more time appropriate – a French version of a King Cake with puff pastry and almond meal, just in time for Mardi Gras.  It was going to be delicious.  But these cookies, these globs, they did me in.

DSC_0505

You still don’t believe me?!  Just look at these!  They are fudgy enough to be brownies in cookie form.  They are nutty enough to be a brittle within the brownie/cookie.  And they are chocolately enough to, well, make you believe in magic again.  Yes.  They’re that transformative.

DSC_0508

And the fun part is that globs don’t have to follow just one recipe!  The original recipe had peanut butter chips.  I think that coconut and macadamia nuts could be a nice tropical version!  Add toffee, more espresso powder, and walnuts, and oh man.  I gotta go make some more.

DSC_0519

Chocolate Globs (adapted from Barefoot Contessa)

This is going to be hard to do, but don’t eat these cookies hot.  In fact, wait a day before you dig into them.  For two reasons: 1. these cookies are fudgy like brownies – they just taste like melted chocolate when you eat them just out of the oven, but there are so many more things going on!  And I want you to enjoy all of those lovely things!  And 2. you may even be disappointed if you eat these hot.  You will be like, oh man, I put all of these nuts in these cookies, and I really should have toasted them, man!  They taste raw!  But alas, they don’t once you cool them.  And you will appreciate the walnut as a walnut and the pecan and a pecan and the world will be a happy place.

6 tablespoons (3/4 stick) unsalted butter
6 oz. semi-sweet chocolate chips
6 oz. dark chocolate, chopped (or dark chocolate chips)
2 oz. unsweetened chocolate, chopped
2 eggs
1 tbsp. instant espresso powder
2 tsp. vanilla extract
scant 3/4 cup sugar
1/3 cup + 1 tbsp. all-purpose flour, divided
1 tsp. baking powder
1/2 tsp. salt
1 cup whole walnut halves (do not chop)
1 cup whole pecan halves (do not chop)

Preheat the oven to 325 degrees F. Line a few sheet pans with parchment paper.

In a microwave-safe bowl, melt the butter, dark chocolate, and unsweetened chocolate, in 30 second intervals, stirring after each time, until just melted. Remove from the heat and cool for 15 minutes.

With an electric mixer, beat the eggs, espresso powder, and vanilla until combined.  Add the sugar, raise the speed to medium-high, and beat for 4 minutes, until the batter is thick and falls back on itself in a ribbon.

With the mixer on low, slowly add the chocolate mixture to the egg mixture until combined.  Combine the 1/3 cup of flour, baking powder, and salt in a small bowl and fold it into the chocolate mixture with a rubber spatula until no streaks of flour are left. In another bowl, combine the walnuts, pecans, the semi-sweet chocolate chips, and the tablespoon of flour, ensuring that each piece of the add-ins are coated by the flour.  Fold it into the chocolate mixture. With 2 soup spoons, drop rounded mounds of batter 1 inch apart onto the prepared sheet pans. Bake for 15 minutes exactly. Cool on the baking sheets.

Dark Chocolate Orange Pudding

February 21, 2014

DSC_0491

You know that kind of hot chocolate that’s super thick and dark and, well, ridiculously delicious?  I love it.  And lucky for me there is a hot chocolate festival going on right now.  It is exactly this thick, European-style drinking chocolate.  Except they are brilliant and take it a step further, because the festival has a new flavor every day for the entire month.  It is, of course, perfect for this time of year, being piping hot, with wintery flavors and so satisfying.  I go everyday.  It is not good for me.

DSC_0472

So, of course, I needed to figure out how to make that kind of chocolate satisfaction at home.  The hot chocolate festival was my inspiration.  What I did, though, was refrigerate it, turn it snack-like (less of an indulgence, if you will), and add my own summer-like (even though oranges are at their peak in the winter – am I the only one that thinks that’s odd?!  let’s discuss this at another time) flavorings.

DSC_0475

Call it wishful thinking for a cold, summer-like dessert, or call it practical for someone who no longer needs any more winter of indulgence.  It doesn’t matter.  All you really need to know is that it only takes 20 minutes to make this super comforting dessert.  So, go on.  Have it warm, and call it weather-appropriate!  Chill it and, you know, call it pudding.  Either way, you will be glad you did.

DSC_0495

Dark Chocolate Orange Pudding (adapted from Smitten Kitchen)

1/4 cup (30 grams) cornstarch
1/2 cup (100 grams) sugar
1/8 teaspoon salt
3 cups whole milk
6 ounces bittersweet (between 65 and 75%) chocolate, coarsely chopped
zest of 1 orange

Stir together the cornstarch, sugar, salt and orange zest in a medium saucepan.  Slowly pour in the milk in a thin steam, whisking as you pour, so that lumps don’t form.  Mix until fully incorporated.  Place over low heat and stir occasionally, scraping the bottom and sides. Use a whisk as necessary if lumps begin to form.  After about 20 minutes or so, just before it starts to simmer, the mixture should begin to thicken, enough that it will coat the back of a wooden spoon.  Add the chocolate, and continue stirring for another 4-5 minutes, until chocolate is fully incorporated, there are no bits of chocolate left, and mixture is quite thick.  Remove from heat and run mixture through a fine strainer.

Distribute among individual pudding cups or one large serving bowl, and cover with plastic wrap.  If you don’t like the skin that forms on a pudding, place the plastic wrap directly on the surface of the pudding.  If you like it, loosely cover the container.  Place in refrigerator and chill until it is cool and set, about 2 to 3 hours.  The orange flavor develops more as the pudding sits.

Russian Tea Cakes

February 13, 2014

DSC_0459

The Olympics are back!  Which means that I’m back to being glued to my TV, tearing up at medal ceremonies, getting caught up in competition and wishing that I had the balance to get into speed skating myself.  (I don’t).

DSC_0446

But most of all, I love the international celebration aspect.  Just like last time, I wanted to make something host country-themed to bring in the Olympics!  And then I googled Russian desserts.  The search was a bust.  The desserts that I found were either too simple, or way too complicated, or not distinctly Russian enough.  I was contemplating making borscht instead.

DSC_0448

And then I went to the staple: Russian tea cakes.  But Russian tea cakes are actually a perfect dessert to make during the Olympics, because, as it turns out, they are also called Mexican wedding cakes, and Italian wedding cookies, and Austrian crescents, or as us Americans like to call them: butterballs.  These cookies are the most perfect representative of the Olympics.  And they’re delicious too!  A gold medal for all.

DSC_0453

Russian Tea Cakes (recipe adapted from Epicurious)

  • 2 1/4 cups all purpose flour
  • 1/4 teaspoon salt
  • 1 cup (2 sticks) butter, room temperature
  • 1/2 cup + an additional 1 cup of powdered sugar
  • 1 teaspoon vanilla extract
  • 3/4 cup finely chopped pecans, toasted (you can also use almonds or hazelnuts or walnuts)
  • 1/8 tsp. cinnamon

Beat together softened butter and 1/2 cup powdered sugar until fluffy, about 2-3 minutes.  Add vanilla and stir and stir to incorporate.  Mix in flour and nuts until incorporated.  Refrigerate for 30 minutes.

Preheat oven to 400°F.  Scoop out dough into 1-inch balls.  Place on a baking sheet lined with parchment paper.  Bake until just firm to touch, and turning lightly golden brown, about 18 minutes.  Meanwhile, stir together remaining 1 cup of powdered sugar with the cinnamon.  Transfer to rack and cool for about 5 minutes.  Roll completely in the powdered sugar mixture.  Cool completely.  Roll cookies in powdered sugar again and enjoy!

Apple Walnut Strudel

February 5, 2014

DSC_0440

This is an important recipe, because the groundhog told us that we are in store for another six weeks of winter, and the weather people are telling us that we don’t even have to wait 6 weeks, because the next winter storm is already here, and you just looked in your cupboard and you’re out of hot chocolate.  This is an important recipe because we all need comfort in our lives right now, and, friends, let’s be honest: there is nothing more comforting than caramelized apples and nuts in a flaky pastry, all warm and toasty out of the oven.

DSC_0428

This recipe will take you back to a simpler time – October, really.  When the crisp air was just setting in, and cold weather meant hay rides and pumpkin patches, and there was promise of holidays coming just around the corner.  A time when all you were thinking about was apples and everything you can make with them!  It will take you to a happier time.  Not early February when your wool socks have worn down, and when you are at your most content under a blanket…any blanket.  Wow.  This really is a downer of a post!

DSC_0432

But it’s not!  Because it brings to you this delicious apple strudel.  It’s so simple to put together.  It has all the components of an apple pie without that heavy, dessert-y feel.  It’s light and crisp (like fall!), and just lovely with a cup of tea.  Perhaps you want to make it today as the snow falls.  It’s perfect to eat inside looking out the window.

strudel

Apple Walnut Strudel  (slightly adapted from the SoNo Baking Company Cookbook)

Filling:

2.5 tbsp. unsalted butter

1/4 cup granulated sugar

1/2 tsp. cinnamon

1/4 tsp. all spice

1/4 tsp. grated fresh nutmeg

pinch of salt

2 pounds apples, peeled, cored, and diced in 1/2 inch cubes

juice of 1/2 lemon

In a pan, melt butter over medium heat.  Add sugar, spices and salt and mix together so they are blended together as much as possible.  Add apples and stir to make sure that all of the apples are coated.  Cook until apples are soft, about 15 minutes.  Take off the heat and add lemon juice.  Stir to combine.  Let filling cool completely.

Pastry:

2 tbsp. sugar

1 tsp. cinnamon

5 tbsp. unsalted butter, melted

1/2 cup finely chopped walnuts

6 sheets frozen filo dough, thawed according to box directions

turbinado sugar, to sprinkle

In a small bowl, mix together sugar and cinnamon and set aside.  Set up a station with the cinnamon sugar, walnuts in another bowl, and melted butter in a third bowl.  Lay down one sheet of filo, with the long side, or width parallel with the work surface, and carefully brush with melted butter until it completely covers the sheet with a light layer.  Carefully place down another sheet and repeat with butter.  Sprinkle the second sheet evenly with cinnamon sugar and 1/3 of the walnuts.

Place another sheet on top and brush with butter.  Place a fourth sheet on top, and brush with butter, sprinkle with half of the remaining cinnamon and sugar and 1/2 of the walnuts.  Continue with the 5th sheet and brush with butter.  Layer the last and 6th sheet on top, brush with butter sprinkle with remaining cinnamon sugar and the rest of the walnuts.

Spread the apple filling in a 3 inch wide layer at the bottom of the dough, leaving about 1/2 inch pastry at each end and 1 inch at the bottom.  Roll the strudel from the bottom into a flat log.  Tick in the edges.  Set the strudel, seam side down, on the prepared baking sheet.  Pierce several times with a knife to let out steam while baking.  Brush with remaining melted butter and sprinkle with turbinado sugar.

Bake until golden, about 25-30 minutes.  Let cool on baking sheet on a wire rack for 10 minutes before cutting into pieces.

Photo 4 Credit: Farhat Umar

Homemade Digestive Biscuits

January 22, 2014

DSC_0419

I don’t quite remember the first time I had digestive biscuits.  We often had different kinds of dipping biscuits with our tea in the morning.  But most of them were slightly cardboard-y, often flavorless, and just kind of meh.  Oh, I still had them, of course.  But it wasn’t like I thoroughly enjoyed them.

DSC_0407

And then, at some point, digestives came into my life and my tea and biscuit experience completely changed.  These were slightly sweetened biscuits that were light and crumbly, not dense and snappy.  They held up to tea dipping, but they were also so delicious on their own.  I would have them spread with Nutella, or dipped in cold milk, or warm milk, or just plain.  And they’re not even called cookies, so you don’t feel bad having them at any time of day!

DSC_0408

Slowly I converted my entire family to digestive biscuits.  Slowly, I started using digestives in my baking.  And slowly, the world became a happier place.

DSC_0413

So, here we are, with another attempt of making storebought treats homemade.  I’m not going to lie – these don’t take exactly like those that come in that enticing red sleeve.  The texture is more of a shortbread cookie, rather than a crumbly biscuit.  But they are still light and barely sweet, and these, too, hold up to tea dipping and Nutella spreading.  And that’s all you need for a glorious tea biscuit.

DSC_0423

Homemade Digestive Biscuits (recipe adapted from Serious Eats)

1 cup old fashioned oats
1.5 cups all purpose flour
1/2 tsp. salt
1 teaspoon baking powder
1 stick unsalted butter, cold, and diced into cubes
1 cup powdered sugar
1/4 cup milk
2 oz. dark chocolate

Preheat oven to 350 degrees.  Line two baking sheets with parchment paper.

Place oats into a food processor and pulse until it becomes a fine powder.  Add the flour, salt, baking powder and powdered sugar and pulse a few more times until the dry ingredients are well blended together.

Add butter and let the food processor run until the butter becomes pea-sized and the mixture resembled coarse sand.  Add the milk and pulse together until the dough comes together in a ball.

Lightly flour a surface.  Dump the dough out and press together until it is a disc.  Roll out the dough until it is about 1/8 inch thick.  Prick the entire surface with a fork.

Using a biscuit cutter, cut out circles and place them on prepared baking sheets.  Re-roll scraps and keep cutting until all of the dough has been used.  Bake for 20 minutes, or until golden brown.  Let cool on baking sheet for 5 minutes and then let cool completely on wire rack.

If desired, melt the chocolate in the microwave in 30 second intervals, stirring after each interval.  Dip the non-pricked side of the digestive into the chocolate, using a butter knife to help with even spreading.  Place the digestive on the wire rack to let the chocolate cool completely.